 On the way back to Georgetown from our holiday adventures, we stopped to take a picture of the bald eagle nest, just east of Llano, TX on Highway 29. There is a nesting pair in residence and are supposed to be laying eggs this month. The eggs are supposed to hatch in January so we will go back in early Spring to see if the eaglets are visible.
Saturday, December 29, 2012
Llano Bald Eagle
On the way back to Georgetown from our holiday adventures, we stopped to take a picture of the bald eagle nest, just east of Llano, TX on Highway 29. There is a nesting pair in residence and are supposed to be laying eggs this month. The eggs are supposed to hatch in January so we will go back in early Spring to see if the eaglets are visible.Sunday, December 23, 2012
Boondocking in Big Bend
The week before Christmas, we went to Big Bend National Park. We stayed five nights in the Rio Grande Village campground, in a section that does not have utilities. This scenic spot is on the southeast border of the park. You can see it center-right in the image below amid the large cottonwood trees. In the far distance, about 20 miles away, are the Chisos Mountains, the focal point of the park.

This was our first multi-day RV boondocking experience, and the first trip in the new Jayco trailer. The solar project on our trailer was not completed in time for the trip so we had to rely on daily runs of the generator to recharge the batteries. It was probably just as well we didn't try solar, since it was pretty cloudy most of the time. We didn't even bother to bring the telescopes, knowing what the forecast was.
We were able to connect the tri-fuel Yamaha EF-2000isH generator directly to the BBQ propane line at the back of the trailer using a quick-connect fitting. The presence of this line was one of our unknowns leading up to the trip, since we couldn't find anything in the Jayco literature confirming that it was standard equipment, and we hadn't ordered the outside BBQ option. We got the trailer only three days before we headed to the park, but we knew we could fall back on gasoline for the generator if necessary.

Since the National Parks system has strong restrictions on where dogs can go in the park, we spent most of each day driving and walking the primitive back roads. Hiking trails were off-limits to us, except when we took turns taking short walks without Vali. Frankly, this restriction is the main reason we had never gone to Big Bend previously.
Here, we are approaching the Tinaja Carlota, a water catchment basin along the Old Ore Road, one of several day-long trips. The water level is very low, due to the continuing drought we're experiencing in Texas.

Big Bend is a very beautiful corner of the Chihuahua Desert with varied terrain and subtle colors. Here is part of the Rio Grande near the abandoned Johnson's Ranch.

Crossing the Rio Grande is forbidden, although it's very shallow here. The park has many warnings about crossing over to Mexico, although we saw signs that some Mexicans and their livestock were crossing into the U.S.
This is Pulliam Bluff which forms part of the northern edge of the Basin in the Chisos Mountains which lie at the center of the park.

This is another water catchment called Ernst Tinaja, also accessed along the Old Ore Road. Fantastic uplifted and folded layers of sedimentary rock.

Again, a very low water level. There were reports that various animals have fallen into this pool and drowned trying to get to the water. Here is another, more extreme, example of the rock layers in Ernst Tinaja

We saw signs of what might have been a mountain lion kill nearby including the large scat below, but very few animals overall in this portion of the park. Edward did see a javelina in the campground after dark, plus lots of deer sign, and we spotted a few hawks and other birds while driving including a pair of what we believed to be peregrine falcons.

Along the River Road that skirts the southern border of the park, lies the abandoned Mariscal Mine where cinnabar (mercury ore) was mined and refined. The tailings have a pronounced mauve color. The rubble in the area is an interesting mix of grey, mauve, and orange rocks

The Sierra del Carmen, which is in Mexico, across the river from the campground, glows red at sunset giving the range its name.


The park is a beautiful place, and we'd like to go back sometime when the weather is better to do some astronomy under their dark skies.

This was our first multi-day RV boondocking experience, and the first trip in the new Jayco trailer. The solar project on our trailer was not completed in time for the trip so we had to rely on daily runs of the generator to recharge the batteries. It was probably just as well we didn't try solar, since it was pretty cloudy most of the time. We didn't even bother to bring the telescopes, knowing what the forecast was.
We were able to connect the tri-fuel Yamaha EF-2000isH generator directly to the BBQ propane line at the back of the trailer using a quick-connect fitting. The presence of this line was one of our unknowns leading up to the trip, since we couldn't find anything in the Jayco literature confirming that it was standard equipment, and we hadn't ordered the outside BBQ option. We got the trailer only three days before we headed to the park, but we knew we could fall back on gasoline for the generator if necessary.

Here, we are approaching the Tinaja Carlota, a water catchment basin along the Old Ore Road, one of several day-long trips. The water level is very low, due to the continuing drought we're experiencing in Texas.

Big Bend is a very beautiful corner of the Chihuahua Desert with varied terrain and subtle colors. Here is part of the Rio Grande near the abandoned Johnson's Ranch.

Crossing the Rio Grande is forbidden, although it's very shallow here. The park has many warnings about crossing over to Mexico, although we saw signs that some Mexicans and their livestock were crossing into the U.S.
This is Pulliam Bluff which forms part of the northern edge of the Basin in the Chisos Mountains which lie at the center of the park.

This is another water catchment called Ernst Tinaja, also accessed along the Old Ore Road. Fantastic uplifted and folded layers of sedimentary rock.

Again, a very low water level. There were reports that various animals have fallen into this pool and drowned trying to get to the water. Here is another, more extreme, example of the rock layers in Ernst Tinaja

We saw signs of what might have been a mountain lion kill nearby including the large scat below, but very few animals overall in this portion of the park. Edward did see a javelina in the campground after dark, plus lots of deer sign, and we spotted a few hawks and other birds while driving including a pair of what we believed to be peregrine falcons.


The Sierra del Carmen, which is in Mexico, across the river from the campground, glows red at sunset giving the range its name.


The park is a beautiful place, and we'd like to go back sometime when the weather is better to do some astronomy under their dark skies.
Saturday, December 15, 2012
TrueTemp Heater Controller Fails
Just before leaving for the holidays, the unit failed. The measured temperature started drifting upwards, more than 20 deg F at this point. Certainly much more than can be compensated for by recalibration. I don't know yet if this is a problem with the temperature probe or the controller itself but it seems more likely to be the probe. After dissecting a bit, I can see that the temperature probe is not potted in sealant as most good probes are. There seems to be a simple rubber plug at the top of the probe tube.
Interestingly, with this type of failure, the usual trick of using a controller as a backup to the thermostat on the heating rod does not work. The controller effectively shuts off the power permanently and the tank goes cold. Fortunately, this failure is slower but had it happened while I was away, the results would likely have been serious. For now, the JBJ goes on the long list of unreliable heater controllers available on the market.

Update 2013.01.08 - Ordered and received a replacement temperature probe. The guess was correct as that replacement appears to fix the controller.
Friday, December 14, 2012
Travel Trailer Trade-Up
This afternoon, we traded in our Rockwood Roo hybrid travel trailer and brought home a new Jayco Jay Flight 28BHS. Here is the side-by-side on pickup day.

Though the Roo was a great trailer, the tent beds were a bit of a pain to deploy and were really cold in the winter, even when using heated mattresses. We ordered the new trailer from Jayco though the nearest dealer, Crestview RV in Buda, TX
We really like the floor-plan on the 28BHS, though we expect to make a few modifications.
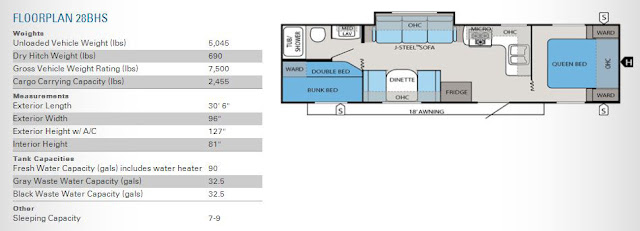
The storage bay under the back bunks came with the new, larger access door. Compared to the Roo, the amount of storage is amazing.
Our planned modifications include:

Though the Roo was a great trailer, the tent beds were a bit of a pain to deploy and were really cold in the winter, even when using heated mattresses. We ordered the new trailer from Jayco though the nearest dealer, Crestview RV in Buda, TX
We really like the floor-plan on the 28BHS, though we expect to make a few modifications.

Our planned modifications include:
- add solar power
- fix the placement of the fresh water pump which rattles badly - it is not attached to a solid surface.
- redesign the back sleeping area as one-level bed, removing the shirt wardrobe and the bunk bed
- upgrade the bathroom vent to a more powerful fan
- replace the sewer vent tops with Cyclone vents
- replace the shore-power cable with a detachable version
- various hooks, hangers, and accessories
Monday, December 3, 2012
Gravel Trailer Pad
This fall, we decided to upgrade our small hybrid travel trailer to something which would afford us more seasons to camp. The original driveway parking place for the trailer was no longer an option nor was parking on the lawn.
While waiting for the new trailer to be delivered, we decided to convert part of this strip of lawn next to the carport into a gravel parking pad. This would be the proverbial "before" picture.


Next steps will be to bring in some top soil to fill in around the outer rounded corner of the pad and put in some landscaping bushes to frame it all in. We also need to complete the drain at the bottom of the pad, carrying the water further downhill into the back yard.
While waiting for the new trailer to be delivered, we decided to convert part of this strip of lawn next to the carport into a gravel parking pad. This would be the proverbial "before" picture.

After much reading we opted for a pad topped with decomposed granite, or DG, as an effective DIY project. Unfortunately, the soil in our front yard is heavy clay silt, not a particularly stable base to build on. Further down the grade of the yard, this gives way to layered river pebbles as I discovered in my observatory project.
First step was to excavate out some of the clay. We rented our friend the front loader and scrapped off layers of the clay ...

... depositing in out in the "wild" part of our back yard.

We excavated a section 12 ft by 70 ft leaving plenty of room to maneuver the trailer into place next to the carport. Overall depth is about 10" on average with a few over-zealous spots down 14".
Once the area was dug out, we cleaned up the edges and the two ends where the front loader couldn't reach by hand. This took several weeks.

In the process, we discovered the fabled sewer clean-out that the plumber insisted must exist. We knew from the utility department flag where the sewer line must run but not where the clean-out was. Naturally it ended up in the middle of the project area. We will treat this as a "feature" and use it as a dumping point to clean the RV tanks at home.

One of the design dilemmas was how to edge between the trailer pad and the surrounding lawn. When it came time to put in the base material, we only wanted to rent the front-loader one day to reduce rental costs. We needed something we could build ahead of time that would act as a temporary retaining wall and remain as an edging.
We decided to build edging that looks like an ancient fort. We fastened 6 foot sections of side-by-side 4" PT rounds. Every 6 foot we buried a couple in a bit of concrete to hold the assembly up. Here is the complicated rounded-corner bit in progress.

Once done, we had a self-standing basin in which to fill with material. The outside will eventually be backed by top-soil to within a few inches of the top. This will be less of a retaining wall and more of an industrial-grade edging when all is done.

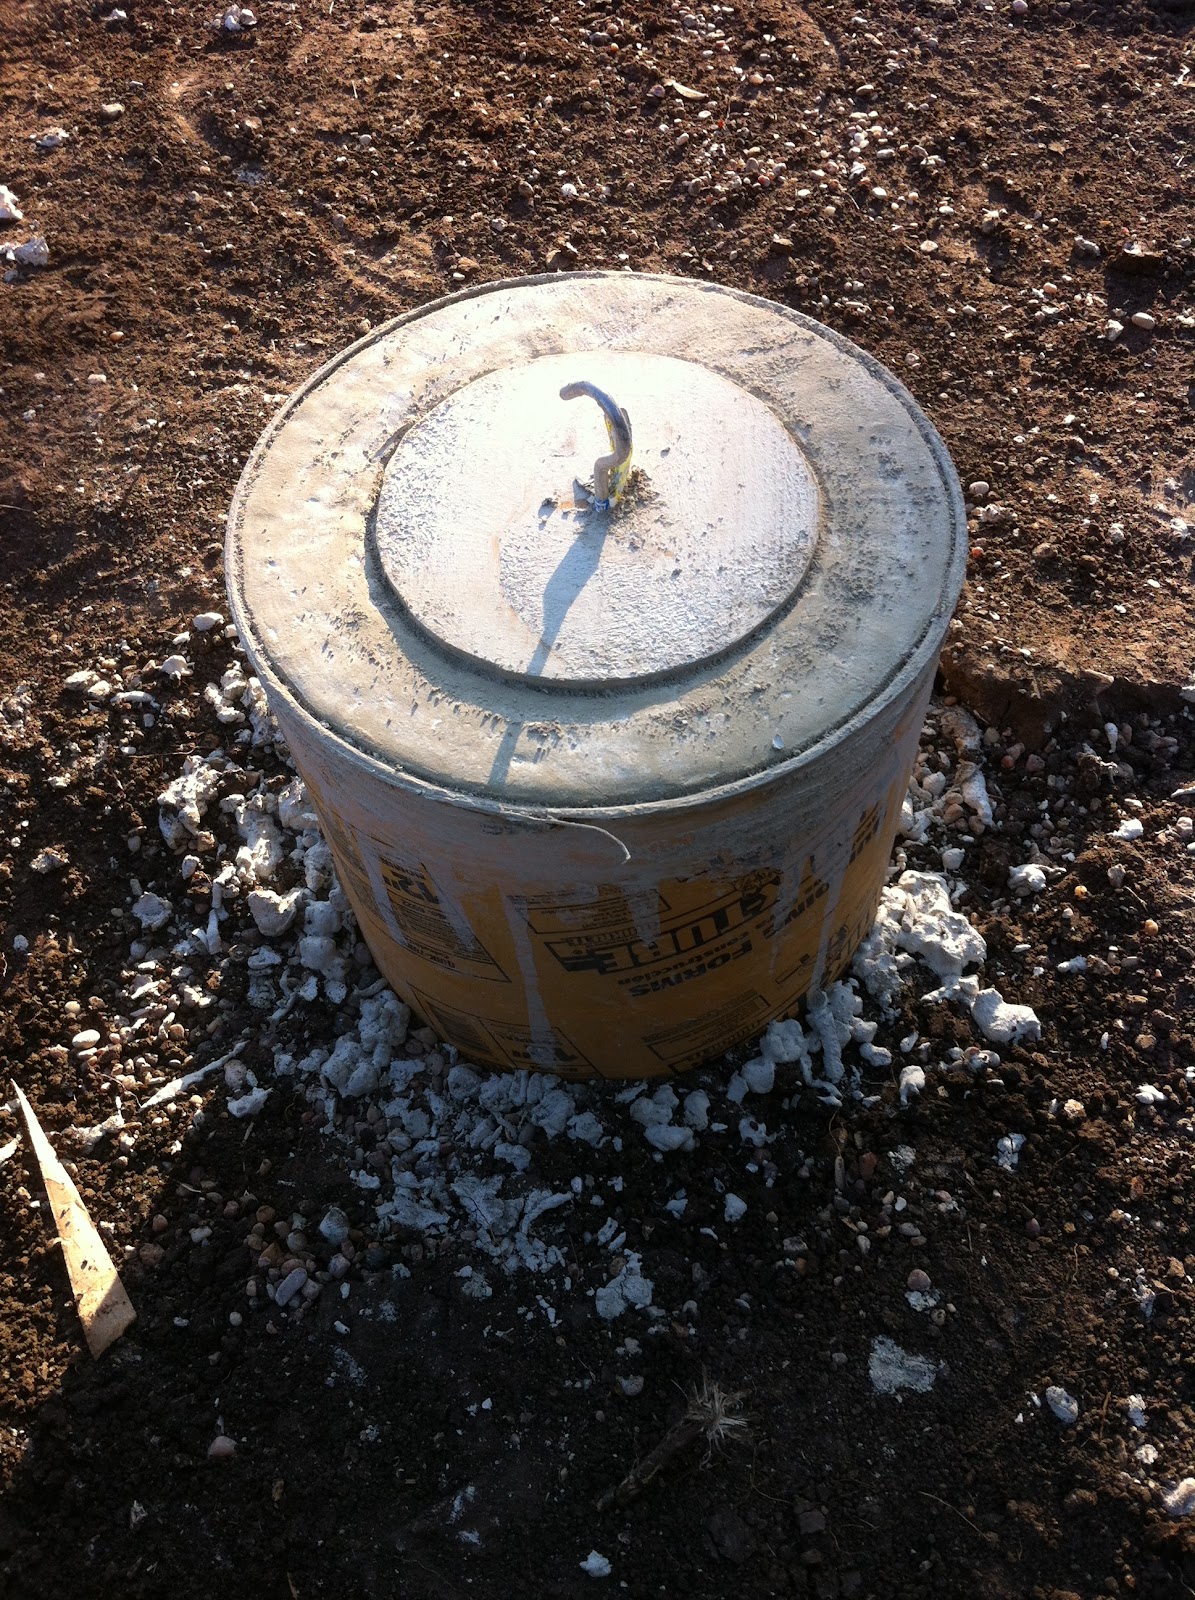
Next step is to take care of that sewer clean-out which will be right in the path of the truck. We created forms with spare Sonotubes and rebar making a protective sleeve around the clean-out. We should be able to drive on it without stressing the plumbing.

We filled with a couple of bags of high tensile strength ready-mix concrete with a temporary wooden cap. This will form a lip into which I can drop a plate or other cover.
We are now ready to put in the base material. We had 28 yards of "road-base" delivered. This stuff is a combination of limestone "fines" and coarse rock up to 1" size. We had a couple of yards left-over at the end.
The two of us were able to complete the job of laying and compacting the road base in one very long day. This was done as a series of layers or "lifts", each about 2-3" deep. We placed the material in with the front loader, and raked it out by hand. We moistened it slightly as necessary and compacted each layer down with a steel-plate vibratory compactor. All of our reading emphasized the need to compact thin layers to make a solid base, especially when we are working with such a small compactor.

Though small, this model of compactor was surprisingly easy to use and minimized the vibrations transmitted to our hands. It vibrates in such a way that it moves forward on its own. The hard part is not pushing it forward, it is holding it back when we reach a tight corner.

Once all of the road-base was in, we came back to add some drainage features. The driveway is sloped downhill toward the house and off to the right. That places most of the run off at the bottom end of the trailer pad. Furthermore, the soil in the yard beyond is built up and does not drain very well. Previously heavy rains caused a pool under the carport.
Along the driveway side of the pad, we dug out a trench to lay a french drain. I guess technically this is a "curtain drain" since we are catching and redirecting flow rather than draining out sub-surface moisture. I forgot to snap a picture, but we drilled 1/2" holes in a 3" sewer-and-drain PVC pipe, placed it in the trench on top of a heavy geo-fabric, filled with clean rock, and wrapped it up.
This will catch and divert some of the run off and will also be tied to the gutter down-spout for the carport. This would not have been a great idea if this were a real french drain, but in this case it should work.

The trench is the over-filled with more rock awaiting the arrival of the decomposed granite.

Beyond the end of the trailer pad, along the fence line, we started digging another drain system. This is to divert all of the water that makes it to the end of the driveway as well as to drain the bottom end of the pad. We will finish this project on the second round. In the meantime, when it rains, we have a mucky catch-basin.

The process starts again, this time with the decomposed granite or DG. We had 7 yards of this material delivered. Again, we had about 1 yard left over.
The total height to fill with DG was 2". Again, are reading indicated that thinner is better in terms of getting a solid surface that does not get mushy. We ended up doing 7 separated lifts. More than necessary but it was easier to rake out that way. We did not have the front loader this time so the transfer was all shovel and wheelbarrow and took a bit over 2 days to finish.

Once completed, we rebuilt the gutter down-spout and tied it into the drainage.

We were very pleased with the result of the compacted decomposed granite. We did not use any of the fancy additives due to cost but the surface is still very hard. It has weathered one strong rain so far with no surface erosion or softening.
Here is the "after" picture of the pad.

Subscribe to:
Posts (Atom)