Over the last two nights, I had a chance to image the galaxy NGC-7331 in Pegasus. After preliminary processing of the data, I looked back over my imaging notebook and found that this was one my very early imaging targets. I was interested to compare the two attempts.
The first was created from a series of approximately 20 unguided 1 minute color exposures taken back in October 2008 when I first started astrophotography. Exposures were taken with an SPC-9000 webcam, which I had modified for long exposure, through a Celestron 9.25" SCT. Image scale is 0.46 arcsec/px prior to de-Bayering. Field of view is very small - this is an uncropped image!
The second was created from a series of approximately 20 guided 10 minute exposures through RBG filters. Exposures were taken with a QSI-540ws CCD camera through a TMB-130SS refractor. Image scale is 1.46 arcsec/px.
In looking back, I am impressed what was possible with that little webcam.
In the same image frame as NGC-7331, I also captured the violently colliding group of galaxies called Stephan's Quintet. The inset on the top left shows this group at the same image scale. On the bottom left is an old image of the same group that I took in December of 2008, soon after replacing my wecam with a Canon DSLR.
Since the second night was the peak of the Perseid Meteor Shower, I looked through the frames to see if I had caught any meteors. What I at first thought were tiny, short meteors, I soon decided were probably satellites:
This image is a superposition of three different 10 min exposures. On the first night, at 2012.08.11 00h20 CDT, there was a uniform solid trace, labelled above. A second dimmer trace occurred along a parallel path a few hours later at 2012.08.11 02h50 CDT. I don't know if these are the same satellite.
Of more interest was the pair of traces in the frame from 2012.08.11 02h50 CDT (one trace is below and to the left of NGC-7331 and the other to the left of Stephan's Quintet.) Just 24h later, in the 2012.08.12 02h50 CDT frame, another identical pair of traces appeared (one is to the left of NGC-7331 the other is above and to the right.) The similarities and timing seem too coincidental not to be the same satellite. Since the traces are bright in the center and dim on the ends, I assume this satellite is rotating uniformly.
Update 2012.08.16 - No success in identifying any satellites in this field of view within an hour of the observation in CalSky.com.
Sunday 2012.08.05 - This evening we followed the landing of Mars Science Laboratory via NASA TV streamed from our iPad to the television. At the same time, we followed the flight simulation on the NASA web application "Eyes on the Solar System." I was most impressed with this simulation.
Picture perfect landing after the "7 Minutes of Terror" descent. Odyssey successfully rotated and relayed telemetry and initial images from Curiosity before it went over the horizon. We were thrilled to follow the nail-biting event live. After watching the nightly Olympic coverage, this was like watching the engineering community win a gold medal in world record time. I struck not only by the mind-blowing space-flight engineering but also the communications network that brought all of this live to my living room ... brilliant!
Here is the flight simulation of the sky crane doing its thing in the last seconds of descent. This is what we watched as NASA controllers verbally relayed confirmation of powered flight and sky-crane deployment with the rover dangling twenty feet below.
This is the simulation of the rover on the ground
As the seven minutes of entry proceeded the atmosphere in the control room was charged. Each new bit of telemetry information confirming that this complex choreography was coming off as planned. Once a safe touch down was confirmed, the room erupted in to applause, hugs, and tears. This video captures the moment as we saw it live. I tried to get a shot of the celebration but everyone was jumping around too much. I finally got a shot of controllers watching in awe the downloaded images.
Here is the first high-res shot of Curiosity's wheel. We took a picture of our television broadcasting the NASA TV feed so its pretty fuzzy. The previous shot had been the 64x64 thumbnail of this same image
This next high-res shot on the left is of the shadow of Curiosity on the Mars surface. The dust covers are still on the camera lens. These were later popped off.
What an experience. I anxiously look forward to the science results MSL will generated over the next couple of years. Way to go NASA!
Monday 2012.08.06 - This XKCD cartoon summarizes what today is going to be like
XKCD 2012.08.06 - http://xkcd.com/1091
Today, NASA/JPL treated to some more detailed images. This first image is taken by the High-Resolution Imaging Science Experiment (HiRISE) camera aboard the Mars Reconnaissance Orbiter. It shows the rover descending on the parachute several minutes before touch-down.
This next image is from the left rear hazard camera looking back towards the rim of Gale Crater.
This image is from the front hazard camera, dust cover off now. The rover is facing Mount Sharp, about 6km distant, its main destination.
This weekend, I created this animation from a series of frames captured 2 min apart from 22h00 to 23h30 UTC July 21, 2012. Most of the very active sunspot regions have rotated out of view. I wonder what active section of the sun this corresponds to.
Here is a single frame of the animation.
And here is a link to YouTube with the animation sequence.
Images were taken with DMK41.AU02 camera, 3x Powermate, and Lunt LS60T/PS Hydrogen-Alpha telescope.
Between clouds, I had a peek at the sun this evening and got a nice shot of AR-1520 in a quiet state. Far cry from the X1.4 class flare it released yesterday at 11h52 CDT according to news reports. I will try to watch over the weekend weather permitting.
This image was taken at 19h25 CDT using DMK41.AU02 camera with 3x extender through a Lunt LS60T/PT Hydrogen-Alpha telescope
This weekend, I replaced the lighting fixture on my 185g reef tank. Previously, I was using a Hamilton Cebu Sun fixture with three 250W 14k single-ended metal halide bulbs and four 72" T5 actinic fluorescent bulbs. Main reasons for this replacement were to reduce electrical costs and generated heat and eliminate the cost and hassle of replacing bulbs every 6 months
Original MH/T5 fixture suspended from ceiling
MH and T5 ballasts needed to run lights
After much debate, I picked the Ecoxotic Panorama Pro fixture. I obtained three 24" modules. These have a mixture of pure blue modules (2) and 12k/blue modules (3). To each panel I added a fourth 12k/blue module. There is room in each panel to add 3 more modules if I purchase additional AC adapters.
The panels do not come with mounting hardware since several options are available. I did not want to suspend my lights again so I ordered wall mounts. These however, were intended to be mounted behind a tank flush with the wall. My tank has a 7" space behind it. To deal with this, I built a 1.5" thick wood frame from plywood to which I attached the three wall mount brackets. This frame also gave me a place to tie down all of the messy wiring. I mounted the 6 dimmer switches on the outer edge of the frame for easy access.
Wood frame acts as a "fake wall" to mount brackets
In addition to mounting the lights to this "fake wall", I also only inserted the light panels part way onto the support arms. I left 7" spacing between the back of the panels and the mounting bracket. This allowed me to center the lights on the tank.
Once assembled, the whole unit slipped behind the tank onto the back lip of my tank stand.
Lighting assembly mounted to the back of the tank stand
From the front, you can see the LED panels are place 6" above the water surface. I created a pair of L-shaped wooded trim pieces for the top rim of the tank. To these I fastened a section of black plastic panel. These lift off individually. When in place, they completely hide the glare from LED fixture yet don't trap any heat in the tank. Since each panel is driven by two AC adapters, I can have each of these on a different timer so that I can turn on lights in the tank progressively. In the photo below, note that each panel has only half the modules turned on, both blue and one 12k/blue.
Panels are hidden behind decorative trim
The wall-mounts have a built-in device to allow the panel to rest in this 30 degree position. This is very convenient for cleaning and accessing the tank. Actually more convenient than the adjustable hanging system I was using on the previous fixture.
Cleaning position for the panels
This final photo shows the completed system with all lights turned on. Though hard to make a comparison between these photos, to my eye, the new lights have significantly more blue in the spectrum and the coral colors "pop" much more. I did a quick test with a Lux meter when I got the new lights. I found that I was getting about 40% more light in the upper part of the tank but about 30% less light at the bottom of the tank.
Ecoxotic Panorama Pro - fully turned on.
It remains to be seen how the corals and nuisance algae will respond to the new lighting regime.
Update 2012.08.24 - The fixture is still really easy to work with and keep clean. The added blue light makes coral colors stand out more, especially the fluorescent greens. The corals are growing at about the same rate as before. Cyanobacteria has not bloomed as it was doing with the aged VHO/MH combination I had before but it is not completely absent. So far, I am still pleased with the change.
Update 2012.09.20 - I have now had two of the 24V 60W AC/DC adapters fail. Ecoxotic was very easy to deal with; simply filled out an on-line return request and emailed receipt photo.
Update 2012.12.01 - I had put the remainder of the adapters on a "heat sink" and put a little fan across them. No new failures.
Update 2013.03.20 - Over the past few weeks I have gotten failures on several dozen LED elements. These mostly on the modules that are on for the longer photo-period so have had more total run-time. Not sure what is going on because these, unlike the AC adapters, are out in the open in a cool room with plenty of circulation around them.
You can see on these 6 modules the number of dark slots. I measured a temperature of 106 F on the sides of the modules which are lit. Ecoxotic specifies a required temperature of 131 F or less.
Update 2013.04.06 - I received and installed the replacement LED modules. I also raised the lights from 6" to 8" above the water. 6" was the minimum height specified by Ecoxotic. Temperatures on the modules when lit range from 89 °F to 109 °F.
Update 2013.05.05 - Two more modules of the original batch are failing, these being from the shorter photo-period. Ecoxotic has replaced these as well.
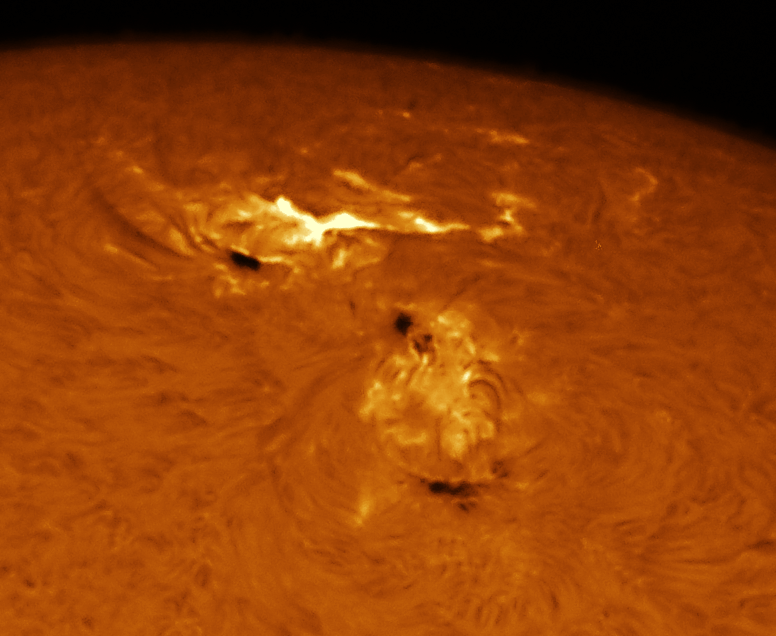
Serendipity strikes again! Yesterday evening, after getting home from work, I decided to check out the solar conditions and to look at the new sunspot complex just coming into view. For reference, here is a NASA white-light image showing the position of various sunspots today. The new complex is on the lower-left and AR1515, which has been very active recently, is on the lower-right. Note the size of Earth in comparison!
I set up my Lunt LS60T/PS Hydrogen-Alpha telescope with a DMK41.AU02 camera and a 3x tele-extender. There was lots of activity across the entire surface so I decided to make a high resolution mosaic image of the surface and the prominences.
Near the beginning of my sequence, I obtained this image of AR1515 at 22h52 UTC. Some activity in the region, but nothing spectacular.
AR1515 Sunspot - 22h52 UTC
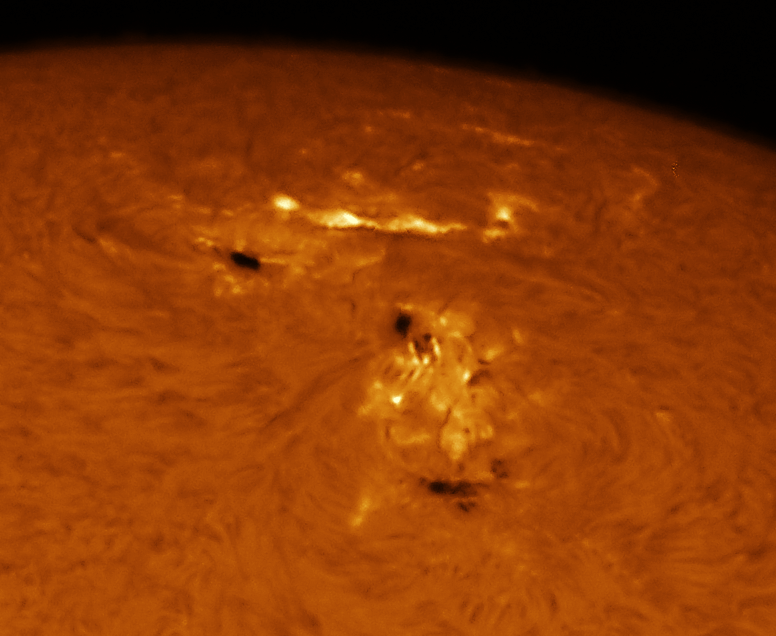
After sequencing through about 20 frames, I went back to admire AR1515 again. To my amazement, it looked quite different. After verifying that I had not inadvertently changed the exposure parameters, I captured this image at 23h16 UTC.
AR1515 Sunspot - 23h16 UTC
Clearly a flare had erupted in the intervening 24 minutes. I did not have enough experience to judge if this was a large or small event, but it was bigger than anything else I had seen in my telescope. Since the camera was saturated at this exposure, I reduced the exposure length by a few stops to see more detail. I continued to capture frames at this exposure as the flared died down. A few of these are shown in the sequence below.
AR1515 Sunspot - 23h17 UTC
AR1515 Sunspot -23h21 UTC
AR1515 Sunspot -23h23 UTC
AR1515 Sunspot -23h27 UTC
AR1515 Sunspot -23h33 UTC
AR1515 Sunspot -23h35 UTC
AR1515 Sunspot -23h37 UTC
This was my first capture of an obvious flare in progress. The next morning, I received a news bulletin on my iPhone application "3D Sun" indicating that a class X1.1 flare had occurred at 23h08 UTC in the AR1515 complex. Right in the middle of taking the mosaic.
Solar Bulletin received on iPhone
This event has even made it onto a number of internet news sites as the biggest flare event of the summer season, though not nearly as large as the X5.4 event on March 6, 2012. Never know what you are going to see when you look at the sun!
UPDATE 2012.07.08 - Completed the original mosaic image of solar disk and prominences.
Our adventure to Haleakala began at the end of the Summer of 2011. My wife Danielle's family was planning a celebration of her parent's 50th wedding anniversary in Hawaii. Her older brother Ross Cunniff, also an amateur astronomer, suggested that if we were going to be in Hawaii during the Summer of 2012, why not time the trip to coincide with the transit. That plan was heartily endorsed by the astronomy buffs in the family.
From an astronomical observation point of view, weather patterns suggested we would need to find a high elevation site to ensure clear skies. This left us with two basic choices: Haleakala on Maui and Mauna Kea on Hawaii ... not surprisingly, the two sites with professional observatories. Mauna Kea is higher, at 14,000 feet, but we had visited it two years ago and knew that it would be physically difficult to manage10 hours of activity at the summit. The Mauna Kea Visitor Center at 9,300 ft. elevation is much better, but we did not recall it having a very good western horizon. In the end, we chose Haleakala because we thought it would be less crowded and would be high enough at 10,000 feet to be above the clouds but not as likely to give us altitude sickness. Danielle also liked the symbolism of watching the transit from the "House of the Sun."
After consulting aerial views, I proposed that we arrive on the mountain mid-morning (after the sunrise crowd left) and that we attempt to set up at Pu'u Ula'ula or the "Red Hill Summit" observation area located at 10,023 ft. We later had a possible lead on getting permission to setup within the Maui Space Surveillance Complex, but that fell through due to security and logistics concerns when the observatory outreach staff began to plan for the anticipated crowds.
Once we decided on the site, Danielle and I needed to figure out what sort of equipment to bring along. So began several months of indecision. We wanted to be able to take good pictures of the transit, but we were limited by what we could take as checked and carry-on luggage. For a mount, I purchased a used Losmandy GM-8 from a local astronomer. This offered a stable platform that I could also use for deep sky imaging on the trip and in future travels. I was able to get the complete mount and accessories into two hard cases, each just at 50 pounds. For a scope, we debated between several choices: a simple white-light filter for a telescope or camera, a Herschel wedge, a budget H-alpha telescope such as the PST, and a nicer H-alpha telescope such as a Lunt. In the end, we chose to bring a Lunt LS60T/PT and a simple Kendrick film cover for our DSLR and 400mm lens with a 2x teleconverter, all of which traveled in carry-on Pelican cases. Ironically, Ross ended up bringing the other combination, a Baader Herschel wedge and a PST. I purchased the Lunt last fall and had several months to practice imaging with it. I also figured out what combinations of optics would result in what image scales. However, despite my best effort to anticipate from what side of the field of view Venus would first appear, I still got it backwards.
We also took advantage of the partial annular solar eclipse on May 20 here in Austin to do a dry run with the Lunt and the DSLR setup. For the eclipse, we imaged for 2 hours in 90 degree weather at an elevation about 300 feet above sea level. We knew that 7 or more hours at 50 degree Fahrenheit at 10,000 feet would be much more challenging.
Hauling all of our luggage was still a challenge, especially with the draconian rules on curb-side check-in at the airports. We got our equipment to Maui with no problems (unlike Ross, who shipped his mount and spent an anxious day worrying about it and his misdirected luggage). After arrival, we went to Wal-Mart to purchase two marine batteries to supply power for the mounts, cameras, and laptops.
On June 5, the day of the transit, Danielle, Ross, and I got up at dawn and headed out for the 2 hour drive to the summit. It took two cars to bring all of the equipment. The road to Haleakala is popular with cyclists, mostly descending the 30 miles of switchbacks after sunrise. Unbelievably, while we were chatting on the summit, we met a guy who had cycled UP the entire road ... and it was not Lance, though he was wearing a "Mellow Johnny's" shirt!
At sea-level the sky was overcast and the temperature was in the mid-70s. We punched through all of the clouds long before we got to the summit. Finally arriving at the summit we had left even the scrub behind and were in a terrain that looked like Mars, with highs in the low 50s. This view shows that last leg of the climb. Red Hill Summit is in the center with the observation shelter just to the left. To the far right in the distance is the observatory complex.
Once on the summit we had an unobstructed view in all directions. To the East was the main crater of Haleakala below us, the clouds slowly creeping up over the crater rim.
Our main weather concern had been the winds which had plagued Maui for the previous week. Sure enough, when we got to the summit at 9 am, the winds were strong, with gusts that made walking difficult. This did not bode well for observing. After some discussion about going back down to a lower elevation, we chose to set up right in the lee of the observation shelter. Even though the winds died down by transit time, this proved to be a fortuitous choice. Not only did this give us a sheltered spot with a wall and drop-off to the West, we also ended up right next to where other public-outreach activities were planned, unbeknownst to us.
Others astronomers showed up later, including some French observers hoping for the same spot an hour later. I think they may have gone down to the visitor's center area; we did not have a chance to see them again. We set up as quickly as possible and even so weren't quite ready when the transit started; among other things, I forgot to change the elevation of the mount from the 32 degrees latitude of Austin to the correct 20 degrees for Hawaii, which we corrected in mid-transit. In the picture below, Ross's setup is on the left and I am on the right. Danielle took charge of the white-light camera and also took pictures of the day's activities with her point and shoot.
Right next to us, Gilson Killhour (shown in the red jacket below), a math teacher from the Seabury Hall school on Maui, set up a "Citizen Scientist" booth which included a cool "Sun Spotter" device which projected a large image of the transit and major sunspots. He was joined by other volunteers and by a park ranger, Keith, who was very helpful throughout the day.
Between us all, we kept up a flow of explanations and demonstrations with the non-stop stream of visitors to the site over the course of the day. When we planned this expedition, I had not anticipated how good of a public outreach opportunity this would be. I am guessing that there are now many dozen photos of my laptop screen out there. Kids particularly seemed to enjoy seeing the detail on the surface of the sun, while adults were awed by the power and size of solar prominences.
Our equipment worked very well though I had some problems with my pressure-tuned Lunt telescope losing pressure very quickly. I am still not sure what was going on since it functions fine at sea-level; perhaps it wasn't built for the thinner air at 10,000 ft. To compensate for this, I needed to completely unscrew the pressure knob and re-tune before each of my 5 minute spaced shots. Thus, reaching up to adjust the tuner became the position to assume throughout the day
By the end of the day, we were all totally exhausted. We brought water and some food, but I am sure we did not drink nearly enough and the sun was pretty intense at that elevation. The restrooms were more than a mile away at the Visitor's Center, which meant that we had to take turns so that someone was always watching each set of scopes and capturing images.
As the crowds assembled to watch the setting sun, we began to take down our equipment. Watching the sunset from Haleakala is breath-taking with the deep blue sky and the cloud layer well below you.
One issue we hadn't resolved before heading to Maui was what we would do with the marine batteries we would be purchasing, since we couldn't take them home with us. Our conversation with Gilson revealed that he taught engineering-prep classes which included lots of experimental work. He was quite happy to accept our donation of the batteries to his school. Just before going to the airport on our last day, we dropped off the batteries at Seabury Hall.
Once back home, we began the post processing of our image data. In all, we were pleased with the results. The Lunt LS60T/PT suffered a slight loss in detail due to the altitude but, other than the continuous re-tuning hassle, generated excellent results. The full frame image below is a 2x1 mosaic with separate exposures for surface detail and prominences. This was taken at "second contact" near the beginning of the transit. The constituent images were generated from 30sec AVI clips taken with a DMK41.AU02 video camera. You can see some interesting activity all over the solar disk. Too bad there were not some spectacular prominences active at the time of the transit.
I also assembled the entire sequence of images over the course of the transit into an animation posted on YouTube. Watch for the nice flare erupting in the large bright region.
The enlarged shot below is "third contact" at the end of the transit. For me, this is a pretty special shot since this is the one that would have been impossible to get from the mainland.
Using the DSLR and an 400mm Canon lens with 2x extender (equivalent to a 1280mm focal length at f/11), we got some very nice white-light shots. Though this configuration does not show granulation, filaments, or prominences, the sunspot details are much better. The tear-drop effect is also more noticeable in this "second contact" image. Note that this image is rotated differently than the solar telescope and shows Venus entering at the upper right, as it appeared to the naked eye through solar glasses. Many visitors on Haleakala also reported being able to see Venus naked eye mid-way through the transit.
In all, a memorable trip to experience the 2012 Venus Transit and the special place which is Haleakala, Maui. To get Ross's perspective on the transit, you can read his blog post.
Near the end our our Maui trip, we were snorkeling in Honolua Bay. As we traversed across the bay from the north side to the south side, a pod of spinner dolphins passed beneath us. They did not stay in the bay longer than it took to circle it once, wow a few snorkelers, and head back out. I manged to get a few still shots with a GoPro camera but I was far enough away that the image contrast had to be boosted considerably.
Spinner Dolphins in Honolua Bay, Maui - GoPro2
View of Honolua Bay from the north rim. The dolphin pod swam under us a bit to the left of the sharp promontory at the south side of the bay.