Sunday, August 31, 2014

Tiger Swallowtail on Milkweed

Today, we saw our first Tiger Swallowtail on the tropical milkweed. This one is a male as recognized by the smaller amount of iridescent blue.

Canon 60Da, EF 100-400mm f/4.5-5.6L IS, ISO-400, f/7.1, 1/640 +1.3

Canon 60Da, EF 100-400mm f/4.5-5.6L IS, ISO-400, f/7.1, 1/360 +1.3


Thursday, August 28, 2014

Star Test of Canon 100-400mm f/4.5-5.6L IS Lens

Last year, I tested my Canon EF 70-200mm f/4L lens for astronomical imaging. Those results showed very good performance at 200mm and adequate performance at 70mm. This has been borne out by actual imaging sessions with the lens. This evening, I repeated a similar test with my Canon EF 100-400mm f/4.5-5.6L IS lens which I have been using for birding. My previous tests on test pattern charts showed promise that this lens might be comparable to the fixed Canon EF 400mm f/5.6L lens that my wife uses for imaging. Here is the MTF chart for the Canon EF 70-200mm f/4L lens:


Test Setup

My hope is to use this lens with the QSI-540ws for wide-field imaging. Since I cannot electronically stop the lens without a DSLR, I decided only to test the performance of the lens with the aperture wide open. In order to more easily capture color images to test for chromatic issues, I used the Canon 60Da instead of the QSI to gather the test images. I found that 300s exposures at ISO-400 gave a suitable histogram shape. I auto-guided during the tests to minimize tracking issues.

The DSLR and QSI have different fields of view. To show "corner performance" for both of these cameras, I am reporting the detailed star images for several regions of the images as shown below. The blue frame is the field of view of the DSLR. The smaller green frame represents the cropped region I would have obtained using the QSI.  The four yellow circles are the regions detailed herein. These show the center of the frame, the corner for both of the cameras, and the mid frame region.


I performed the imaging tests at four focal lengths: 100mm, 200mm, 300mm, and 400mm. I had intended to test each of these focal length with the aperture wide open. Unfortunately, I inadvertently left the aperture stopped down to f/5.6 on the 200mm test somewhat negating the value of this test for me.

Test at 100mm @ f/4.5

The following image shows the field of view at 100mm.  The bright star is Deneb.


Details in each of the four regions are shown below:


Test at 200mm @ f/5.6

The following image shows the field of view at 200mm. Note that the lens was unintentionally stopped down from f/5 to f/5.6 in this image. Introduction of the octagonal edges of the iris into the light path causes some strong diffraction patterns on the stars. I recall that for the Canon 70-200mm f/4L lens this occurred without significantly improving the shape of the dimmer stars. Personally, I prefer round stars.


Details in each of the four regions are shown below:


Test at 300mm @ f/5.6

The following image shows the field of view at 300mm.


Details in each of the four regions are shown below:


Test at 400mm @ f/5.6

The following image shows the field of view at 400mm.


Details in each of the four regions are shown below:


Observations

At the shorter focal lengths, this lens performed very well. The slightly stopped down image at 200mm was excellent though I will not be able to stop down the lens when using the CCD camera. I would say that this lens is close in performance to the EF 70-200mm f/4L at 200mm and significantly better at 100mm.

Whereas the EF 70-200mm f/4L performed better at longer focal lengths, this lens seems to perform better at the shorter focal lengths. I qualify this conclusion somewhat because of the fact that the elliptical distortions are oriented the same way across the full frame rather than being radially symmetrical. It may be that I am seeing a tracking issue rather than a lens issue. At 400mm, I also notice more pronounced asymmetry in the diffraction spikes and halo around Deneb.

Another interesting difference between the two lenses was "image shift". As I used the electronic focusing controls in Astro-Photography Tool, the image would shift slightly as the focusing motor changed direction. Fortunately, the amount of shift was just small enough that the star stayed within the view port of the Focusing Aid feature in APT. I assumed that this motion was related to the image stabilization mechanics of the lens though it was turned off for these tests. I recall that when I focus on birds with IS enabled, there is a noticeable image shift in the view finder. Coincidentally, the orientation of this shift happens to matches that of the distortion visible in the 400m images.

Th EF 100-400mm f/4.5-5.6L lens has a full-time manual focusing ring similar to that of the EF 70-200mm f/4L. However, I did not have the time to test the ease of focusing manually.

I think my next step is to retest explicitly on the QSI, test the manual focus, and verify more carefully tracking quality.

Update 2014-08-31

Based on a post on Cloudy Nights, it turns out that I can use the following trick to stop down the lens and still use the QSI:
  • Attach the Canon 60Da to the lens
  • Dial AV mode and set desired f-ratio
  • Press the DoF preview button to force the iris to close
  • Detach lens while holding the DoF button pressed
Looking through the lens, I can see that the iris remains despite being unpowered. Assuming this does not damage the camera or lens, this gives me one option for stopping down the lens.

Another suggestion was to use camera filter step down rings as an external stop. This is a bit challenging because the "a little bit of stop" translates to a wide range of aperture sizes across the zoom range. By way of calculating what I might expect, I used the imaged star fields to estimate the actual focal length of the lens at the four marked positions on the lens barrel that I used to perform the above tests. This calculation gives me: 102mm, 197mm, 293mm, 380mm. Yes, this lens is not really 400mm.

Checking one of my 77mm filters for this lens, the measurement refers to the outer diameter of the threads. The filter itself has a clear aperture of 70mm which is still wider than what can be seen through the fully open iris, 68mm. The clear aperture of a step ring should be close to the inner thread size.

The table below shows the necessary inner ring size to match wide open aperature and aperture reduced by 1/3 stop.

MarkingFocal Lengthf-ratioAperture Open-1/3 StopNearest Ringf-ratio
400380 mmf/5.667.9 mm60.3 mm77-62 mmf/6.1
300293 mmf/5.652.3 mm45.5 mm62-49 mmf/6.0
200197 mmf/5.039.4 mm35.2 mm49-35.5 mmf/5.5
100102 mmf/4.522.7 mm20.4 mm-f/4.5

As selected, I would be able to sequentially nest the rings. Another option would be to use a 77mm to 67mm step-down ring as a "holder" for circular cut-outs of the right diameter and construct my own set of external stops. I am not sure what matte material to use to minimize reflection glare artifacts.

Update 2014-09-01

I purchased a simple Pro-Master 77mm to 62mm step-down ring and did some more testing last night. This time, I used the QSI-540ws camera and performed focusing manually. The ease of focusing was about the same as with the EF 70-200mm f/4L. That is to say, challenging but doable. Again, I guided the mount and imaged the star field around Deneb for 300 seconds with a Luminance filter. I performed the test only at the longest focal length (380mm), first wide open at f/5.6 and then with the step-down ring attached.

Test at 400mm @ f/5.6

This first imaging test is performed wide open. Same frame regions reported as above.


Test at 400mm @ f/5.6 with 62mm Ring

The second imaging test repeats the test above but with the 62mm step-down ring attached to the front of the lens.


Observations

Either the tracking was better tonight, or the consistent stretching of the stars is somehow related to the DSLR. The stars are much rounder throughout the frame. In the corners there is evident "shuttlecock-shaped" coma but it is not too bad.

The usefulness of the step-down ring seems to minimal at only 1/3 of a stop. The symmetry and intensity of the diffraction spikes on the central star are improved. The halo size and intensity seems to be unchanged. The mild coma on the corner stars remains unchanged.

After performing these comparative test, I left the 62mm ring on and took calibration frames. The flat image field for this configuration looks like:


and has this profile along a centered horizontal slice:


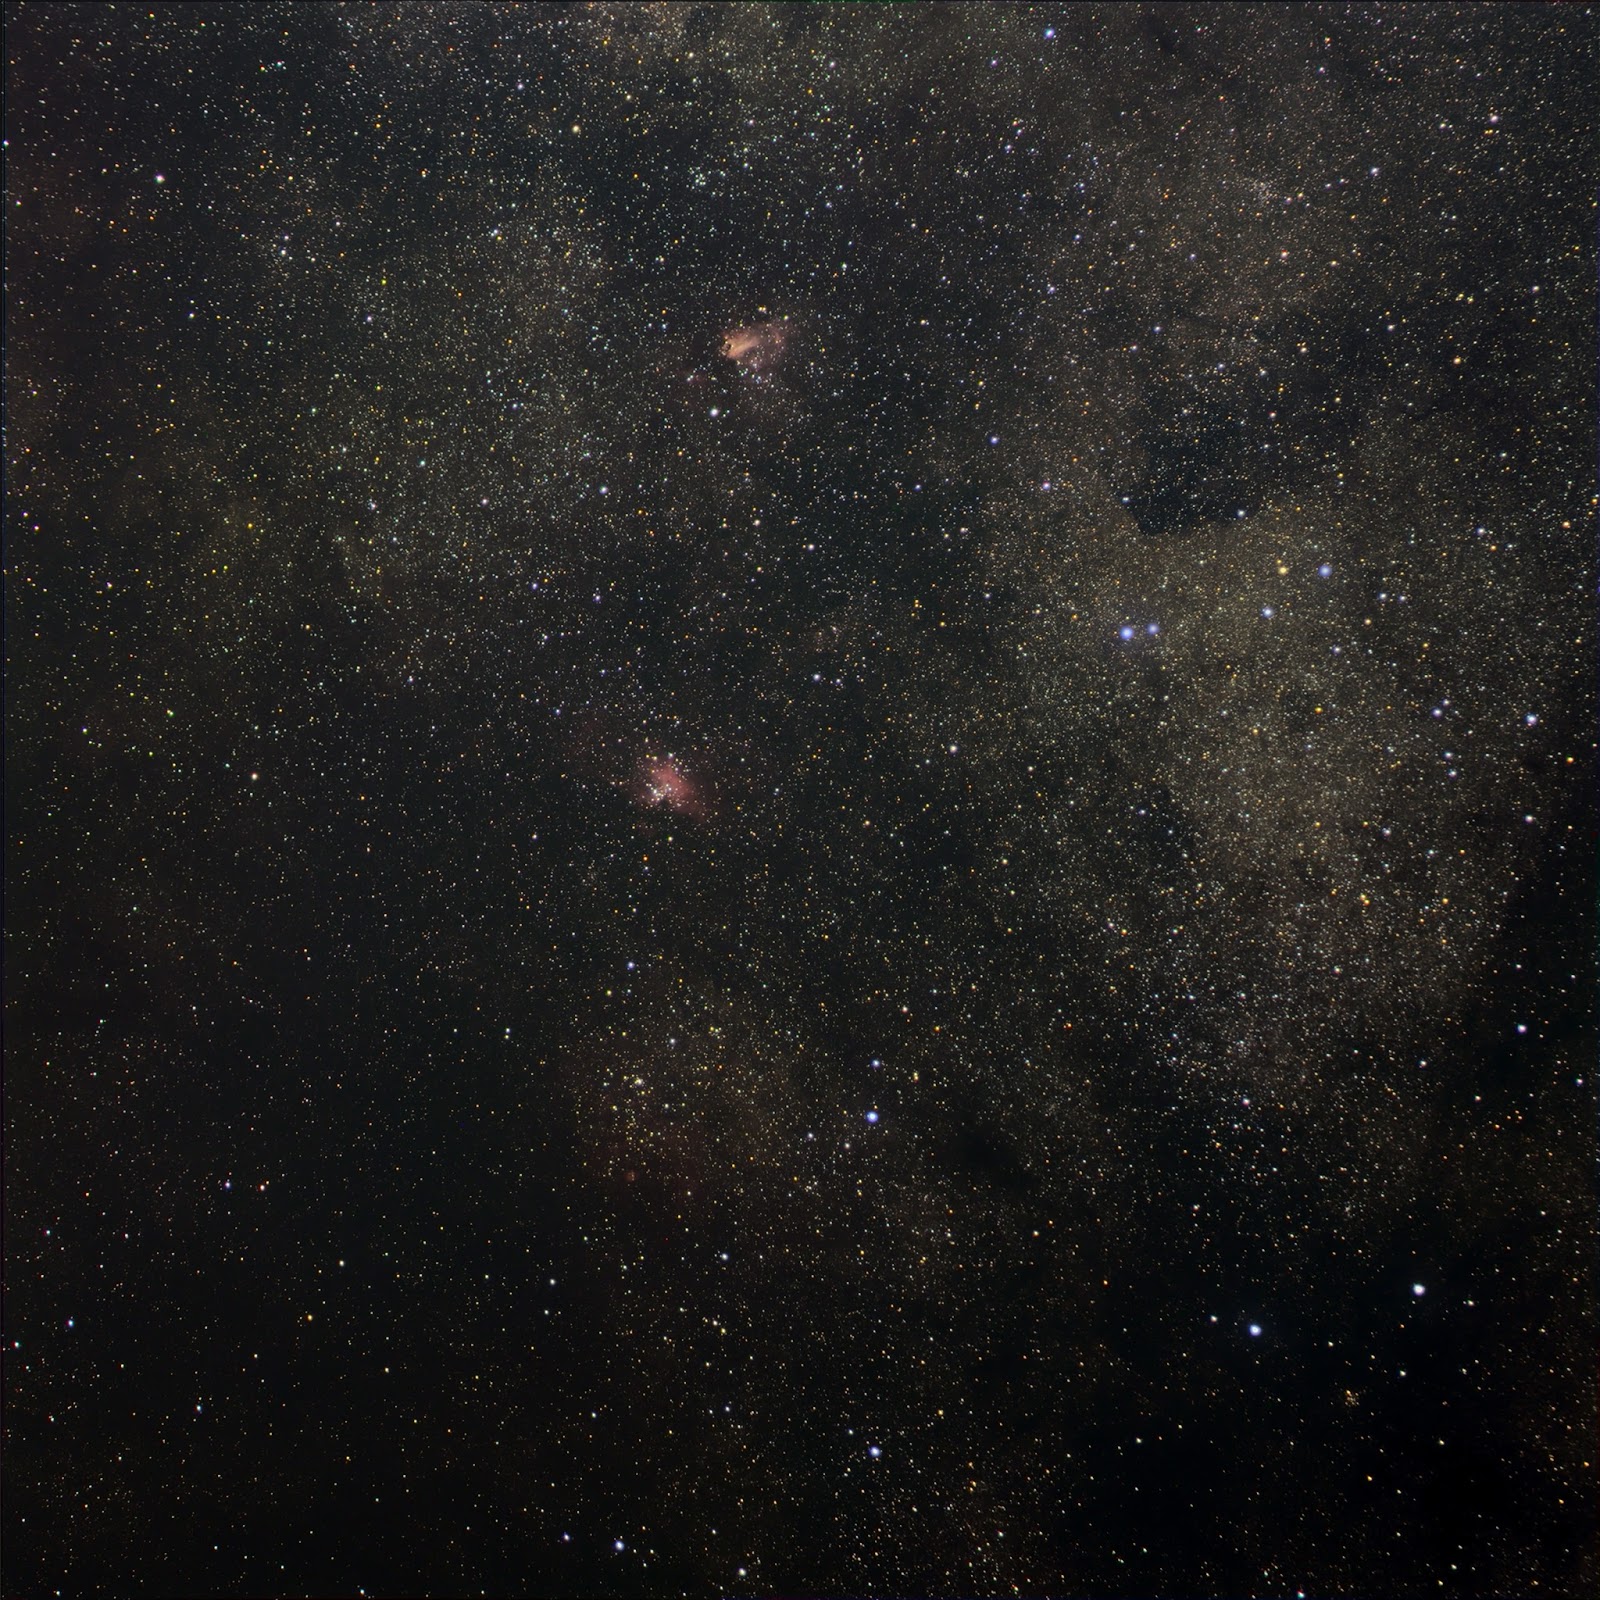
For a real imaging test, I captured eight 15 min frames of the Pelican Nebula with a 12nm H-alpha filter, calibrated and stacked in DeepSkyStacker, then performed some basic stretching, noise reduction, and sharpening in Photoshop as well as reduction of halos on the two brightest stars.

QSI-540ws, Canon EF 100-400mm f/4.5-5.6L, 8x 900s, H-alpha

Saturday, August 23, 2014

Pipe Nebula from Canyon of Eagles

I tried out the CCD/Lens combination this evening at Canyon of Eagles. I spent quite some time trying to image Rho Ophiuchi again with this equipment combination. That was a mistake as the target was too low to get good data.  I then picked up a few frames of data on the Pipe Nebula with better results.

This image is taken with Canon EF 70-200mm f/4L lens at about 100mm. I cooled the CCD to -5C with ambient temperature around 32C. I collected 2x900s Luminance frames at 1x1 binning and 2x300s RGB frames at 2x2 binning. Calibration performed with matching dark and bias frames, 10 each.


I did not collect nearly enough color data - only the stars picked up much saturation. However, even with only two stacked frames in each color, the noise level is considerably less that the DSLR.  Focusing without the EOS electronics is still challenging but possible. At 100mm focal length, the peripheral stars are showing some radial elongation, similar to field curvature issues.

I was also able to get a single set of LRGB frames of a field containing the Eagle Nebula and Omega Nebula.


Sunday, August 17, 2014

Mounting QSI-540ws to Canon Lens

This post describes an experiment in connecting my QSI-540ws CCD to my Canon EF lenses. I started this experiment after last month's imaging of Rho Ophiuci. Even with my best attempt at a Peltier cooler box, the image noise was such that I began longing for my CCD camera.

EOS Adapter - My attempts in finding a suitable adapter were frustrating. I ended up purchasing the EOS adapter sold specifically for my QSI-500 series camera. It is designed with the correct spacing from the focal plane but was nearly $200. The adapter is shown in the center of the photo below. Note that this accessory has the opposite polarity of the easily obtained adapter used to attach a DSLR to a telescope.


With all of my Canon DSLR cameras, the bayonet EOS fitting is never as tight as I would like. This one was no different and allowed noticeable rotational play. In order to minimize the chances of this happening while imaging, I cut a strip of craft foam about 3/4" wide and long enough to wrap around the lens barrel. Tightening this down with a Velcro strap, which I glued to the foam with contact cement, provided enough friction across the joint to keep it from twisting. The final assembly is shown below.


Imaging Deck - In an earlier project, I created an imaging deck for a stand-alone, guided DSLR. That version used a ball-mount for the camera, inadequate for the telephoto lens and heavy CCD camera I am trying to use now. In this project, I started by screwing a 4" Vixen dovetail bar to the tripod ring on the lens, as shown above. I mounted an ADM Vixen saddle to the end of a 7" Losmandy dovetail bar. I had to drill and thread two extra 1/4"-20 holes in the saddle for this. I also use a scrap piece of 1/4" thick plastic as a spacer to elevate the saddle enough to clear the large silver knob on the Losmandy-style saddle that came stock on my GM-8. You can see this in the image below. Previously, I had used the ADM dual Vixen/Losmandy saddle with my mount and "machined" a DEC axis spacer-puck to allow it to clear the RA motor assembly. However, after I upgraded the worm gears to the OPWB kit and installed the new motor mounts, the saddle no longer cleared the motor housings. As you can see in the photos, I have kept the silver puck but reverted back to the stock saddle. With this configuration, my new imaging deck clears easily. In fact, I am able to safely slew the RA axis over 45 degrees past the meridian on either side of the mount, effectively ending the need to do meridian flips half way through an imaging series.


Balancing - Without the additional weight of a telescope, the GM-8 is not able to balance correctly with the 7 lb counterweight fitted to the shaft, even if positioned as far up as possible. In the photos, you can see that I have added three 1 pound weights to the imaging deck. These are end-shaft counterweights for an Orion Atlas. I believe they have 6mm threaded posts. I bolted these from below with the posts facing up. On the top-most two weights, I removed the posts and re-threaded the upper half of the hole to 1/4"-20. I then attached a pair of Orion/Synta finder shoes (Scopestuff #RDPQ), each with a single centered 1/4"-20 bolt. I mounted a red-dot finder on the inner shoe and an Orion Magnificent Mini AutoGuider on the outer shoe. Use of these centered bolts makes it easy to adjust the pointing direction of the finder and guider.


Cabling - The camera and guider require a total of four cables, plus an additional two if I add the dew heater straps. To keep the cables under control, I enclosed these in a 1/2" Nylon expandable braided sleeve from the local electronics store. Strapping this to the Vixen saddle knob with a Velcro strap and pointing it off to the right side ensured that it did not snag on anything as I slewed across the sky. This cable bundle is shown in the photo below. It works both with the camera rotated on its side, as shown, or with the cable ports pointing up. I am not able to rotate the camera with the ports facing down with this system.


Communications - The cable bundle is routed down and strapped to the RA/DEC cable bundle as shown below. The two USB cables are connected to a 4-port powered hub. The RJ-25 cable from the auto-guider plugs directly into the Gemini board. The AC power adapter for the QSI is strapped to the tripod leg below the hub. In addition to the two camera connections, an FTDI USB-Serial adapter is plugged into the hub to connect the laptop to Gemini control board. As well, a TEMPerHum PC temperature and humidity sensor is plugged into the hub allowing me to monitor ambient temperature and dew-point to get an idea of when I might need to refocus.


Computer and Software - My Windows 7 laptop rests on a ledge made from a large kitchen cutting board and attached to the tripod leg of the GM-8 mount. I run the following software during and after imaging sessions:
  • PHD Guider - Auto-guiding with the Orion Starshoot.
  • Astro Photography Tool - Temperature monitoring, camera focusing and control, image framing, image acquisition.
  • SkyTools 3 - Session planning, star atlas, target selection, logging.
  • ASCOM Gemini Driver and POTH Hub - Simultaneous connection of APT and SkyTools to the GM-8.
  • DeepSkyStacker - Calibrating and stacking images.
  • Photoshop CS5 - Post-processing


Imaging Result - The image below of the Butterfly Nebula and Crescent Nebula was composed of two 30 minute exposures taken through an Astronomiks 12nm H-alpha filter. These were calibrated with three dark and bias frames. I am pleased with the results. The Canon EF 70-200mm f/4L lens at the long focal length produces great stars across the field of view. As expected, the stars are somewhat under-sampled, even at 200mm.


I am not seeing the pinched shape on bright stars which I have observed before with this lens wide open. I wonder if the effect is not with the lens but with the DSLR. I did see a pronounced reflection halo around the bright star Sadr. Below is a enlarged view of the effect. On the left is an enlargement of Sadr from the picture above. On the right is an enlargement of Alniyat from the image of Rho Ophiuci in the previous post. I have adjusted the relative sizes to show equivalent image-scales. The DSLR at 4.3um has much finer pitch than the QSI at 7.4um. In the QSI image, the center of the frame is to the upper right. In the DSRL image, the center of the frame is slightly down and to the right. The dark pinched region is always oriented circumferentially.


Focusing and Stopping - With this CCD adapter, it is not possible to close the iris of an EF lens as this requires the electronics in the DSLR camera. Until I rig some sort of external stop, I have to image with the lens wide open. Fortunately, this particular zoom lens has good wide open performance, except for this pinching effect on the brightest stars.

The lack of electronic focus control is a much bigger issue. Like most EF lenses, manually focusing on stars is feels more like squeezing the focusing ring than twisting it. Nonetheless, using a Bahtinov mask and focusing on Sadr, I was able to get the diffraction pattern centered within a few minutes. Using 3 second exposures on a small region-of-interest, a feature recently added to Astro Photography Tool, made this task tractable.