This week, we went to
Seminole Canyon State Park, along the Rio Grande in southern Texas. This was our first astro-camping venture of the year and we hoped to get a view of comet C/2011 L4 (Pan-STARRS). This was a bit far to go, but since it is spring break week, it was very difficult to find any camping sites closer to home with a western view.
We took this image last summer on Haleakala when we were observing the Venus transit. It shows the astronomical complex on the summit and indicates the 1.8m telescope PS1 which is the first telescope in the
Pan-STARRS array. The comet C/2011 L4 was discovered by this telescope in June 2011. Our equipment was a bit more modest.
 |
| Pan-STARRS observatory on Haleakala |
Saturday, March 9
Only a few of the camping sites offered a clear western view and we wanted to setup next to the trailer. We therefore got there a couple of days before expecting to view the comet in order to secure one of these sites. After some brief discussion with the ranger, we were able to get site E22.
On the first evening, we set up all of the equipment. We found a spot just beyond the picnic table awning that gave a good view of the sunset point as well as a clear view of the sky for night time imaging. Having not had a chance to align the mounts, we simply setup the cameras on tripods to view the sunset and to monitor the expected position of the comet in SkyTools.
There was a lot of haze in the sky and we didn't expect much, especially given reports that the comet has similar magnitude to Polaris. Though there were few clouds, the sunset glowed bright orange in the haze; not a good sign. Other campers informed us that there had be heavy winds during the week, possibly contributing to the dust haze. Fortunately the ground here is mostly "desert pavement" and holds the sand in place fairly well.
We scanned the sky with binoculars until after the comet set below the horizon but had no luck in finding anything in the muck. We finished the evening by polar-aligning our mounts in preparation for the next day's comet pointing. However, we did not set up for imaging since the wind started blowing as a front moved through just after dark and continued to howl all night.
Sunday, March 10
We spent the afternoon hiking along park trails. There is a guided tour of the petroglyph caves in the canyon, but our Labrador would not have been allowed. Instead, we followed a new hike and bike trail that follows the rim of the canyon. This gave some great scenic vistas into the water-smoothed canyon floor of the Pecos River basin. We saw very little water in the canyon. I wonder if this a seasonal thing since the on-line literature for the Pecos River shows fly fisherman casting in rapids.
Rather than "power-hiking" all the way down to the Rio Grande overview, we ended up doddling along taking pictures. The desert is showing new spring growth and the mesquite, yucca, and cacti are in bloom.
The hike was very pretty and not too hot. However, the winds gusted all day. Though not boding well for astronomy, it did make it entertaining to watch the turkey vultures which swooped down through the canyons not too far from us.
We even saw some exposed fossils in the rock around the trail. This large mound had a number of snail-like fossils and was right in the middle of the trail.
We set up in the evening to look for the comet, this time with the benefit of a goto mount. With much trial and error, I did manage to find the comet head but it was too far gone into the muck to make out much detail. I stacked a short movie of the comet but it only looked like a fuzzy dot.
This state of affairs would improve over the next two days as the winds calmed and the comet rose higher in the sky. We expected the first two nights to be "practice" so were not too disappointed.
After the comet chasing, we tried some deep-sky imaging. I tried for the horsehead nebula and managed to get an hour of 5 minute shots. I need considerably more data with this camera's small pixels and lower QE (relative to my QSI-540 CCD) to get better image quality. However, I am pleased with the color rendition of the Canon 60Da on the two nebulae in the image which required very little tinkering with the color balance in Photoshop.
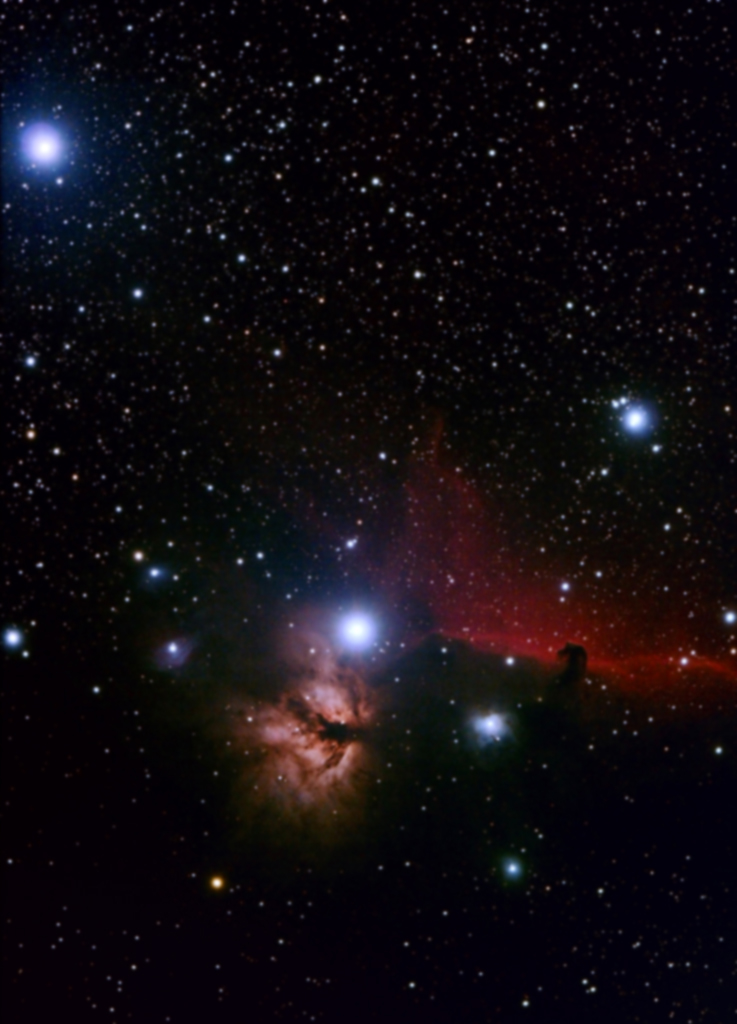 |
Horsehead and Flame Nebulae
Canon 60Da and Orion ED80T-CF, 480mm f/6 12x300s ISO800 |
Getting more data was not to be. Besides the lingering winds, I was having problems with the mount which kept losing its alignment. At one point, I also found that the USB hub was no longer working and borrowed Danielle's. I later decided that all of these problems were due to static electricity zapping the electronics. The air was very dry but that seemed insufficient to account for the amount of static we were generating. Maybe something different about the ground conductivity here? Our dog Vali, eventually started cringing every time our hand approached its nose. I finally gave up at about 1:30 in the morning.
Monday, March 11
After a late start, we drove down to Del Rio to buy a new USB hub, my previous one being fatally damaged by my electrifying touch. On this side trip, we got to see just how low the water level is in the Amistad Reservoir. It was like looking at Lake Travis but on a much larger scale. The highlight of the trip for Vali was barking at the drug sniffing dogs working the US Border Patrol check-point.
The evening began with the same comet chasing routine, but this time we hit the jackpot. Hoping to get a detailed view, I mounted the DSLR on the 80mm telescope. I had not been able to retain fine-alignment on the mount from the previous evening so I performed a one-star alignment on Jupiter, visible at the zenith in the twilight. I then tried a goto, hoping to see the comet appear in the LiveView of the camera ... no luck.
I finally found it by standing back, looking through the red-dot finder with binoculars, and then shifting to the side to observed the nearby sky with this wider field-of-view. I was then able to slew the scope with the hand controller in the appropriate direction and found the comet in the LiveView display. Danielle also found the comet in her piggy-backed 400mm lens.
We each obtained a series of images as we followed the comet down through the haze to its setting point on the horizon. I also helped the family in the next camping site find the comet in our binoculars. They had come anticipating seeing the comet naked-eye ... a feat which was challenging, even if you knew exactly where to look.
My problems with the mount got much worse. I found that when I tried to set the UTC time in the controller, only a series of garbage characters were retained ... interesting that they were always the
same characters shown below - as if the user-input was unable to change the random bits already in the timer chip.
This made it impossible to do even a rudimentary goto-alignment. Fortunately the RA tracking and the guide-port still worked correctly. Given the mount problems, I opted to do wide-field imaging for the remainder of the evening. I removed the telescope and reconfigured to guide a simple camera as described in my
earlier post. I targeted the area around the constellation Orion in the winter Milky Way.
I set up the Canon 60Da with the inexpensive EFS 18mm-55mm IS lens. An article by Jerry Lodriguss indicated that this was a decent starter lens for astrophotography. I set it to the widest FoV and stopped it down a bit to f/6.3. Using the Canon EOS Utility, I focused electronically on Sirius through a mini homemade Bahtinov mask and locked out the auto-focus.
I took an hour of guided 10 minute exposures as well as a sequence of bias, dark, and flat frames using an
electro-luminescent flat-field. I stacked the results that evening. I was very pleased by the level of detail, though serious field curvature is evident on the outer third of the image. I was particularly pleased to see Barnard's Loop ( the red ring around Orion at the bottom center of the frame) as this is the first image in which I have captured this H-alpha region.
 |
Winter Milky Way
Canon 60Da and EFS 18-55mm IS lens, 18mm f/6.3 6x600s ISO400 |
It is fun to zoom in on the image and try to recognized objects ... a bit like a galactic version of
Finding Waldo. In addition to tracing the constellations Canis Major, Canis Minor, Monoceros, Lepus, Gemini, and Orion, you should be able to see the prominent emission nebulae Rosette, Lower's, Monkey Head, Jellyfish, Flame, and Orion. The notable star clusters M41, M47, and M35 can also be picked out.
Tuesday, March 12
This was the final day of observing and the most interesting photo opportunity due to the grouping of the comet, the crescent moon, and Uranus. Most of the day was sucked into dealing with equipment issues, though we did take a short hike in the late afternoon. Danielle was trying to get her laptop to recognize the guider camera and I was trying to deal with the the Gemini controller problems.
Based on the previous night's issues with setting the UTC time, I was afraid that the time IC chip had been damaged. I even contacted Losmandy to see if it could be replaced. As a last resort, I removed the internal battery (which I had just replaced before the trip) and left it out for a half hour. This was based on an internet post that Danielle found indicating that this would allow for a more "complete" reset of the controller. Sure enough, the timer chip started working again and I was able to enter UTC times once again.
 |
C/2011 L4 and Crescent Moon
Canon 450D and EFS 100mm Macro lens, 100mm f/4 15s ISO400 |
For the twilight event, Danielle was able to frame the Moon and comet, as well as Uranus, using her 100mm camera lens riding piggy-back on her equatorial mount. The result was very nice, though Uranus is too faint to see in this image. She separately exposed the telephone poles at the horizon with the tracking turned off.
 |
C/2011 L4 and Uranus
Canon 60Da and Orion ED80T-CF, 480mm f/6 4s ISO100
|
I stuck with the 480mm telescope to get the zoomed-in shot. The comet is obvious at the top of the frame. About two comet-lengths below it is Uranus at magnitude 5.9. Directly below it in the bottom quarter of the frame is the star 44 Pisces at similar magnitude. Zooming in, you might also be able to find the magnitude 7.8 star HD2344, far to the right of Uranus
For the remainder of the evening, I went back to deep-sky imaging. I managed to zap the mount and forced a cold-start of the controller twice during evening but at least I could align the mount again with the functioning timer chip. In fact, I was finally convinced that static discharge was the cause of the problems when, as I was holding my GM-8 hand-controller, I got zapped lightly when touching the telescope and saw the controller initiate a cold-start and CMOS reset. This, of course, just moments after I had finished a multi-star alignment. In addition to being plagued with static issues, I also had problems with the worm-gear binding.
 |
Bode's Galaxy and Cigar Galaxy
Canon 60Da and Orion ED80T-CF, 480mm f/6 8x600s ISO400 |
I managed to get a little over a hour of data with suitable tracking on a galaxy grouping in Ursa Major. Bode's galaxy (M81) is the open spiral in the center of the image and the Cigar Galaxy (M82) is the edge-on galaxy at the top of the frame. You can see only a hint of the glowing H-alpha filaments that characterize it. The smaller galaxy to the left is NCG 3077. All three are about 12 million light years distant and form part of the M81 Group which neighbors our own Local Group. The image shows a number of other members of the group. Try zooming in and finding more tiny galaxies.


