 On the way back to Georgetown from our holiday adventures, we stopped to take a picture of the bald eagle nest, just east of Llano, TX on Highway 29. There is a nesting pair in residence and are supposed to be laying eggs this month. The eggs are supposed to hatch in January so we will go back in early Spring to see if the eaglets are visible.
Saturday, December 29, 2012
Llano Bald Eagle
On the way back to Georgetown from our holiday adventures, we stopped to take a picture of the bald eagle nest, just east of Llano, TX on Highway 29. There is a nesting pair in residence and are supposed to be laying eggs this month. The eggs are supposed to hatch in January so we will go back in early Spring to see if the eaglets are visible.Sunday, December 23, 2012
Boondocking in Big Bend
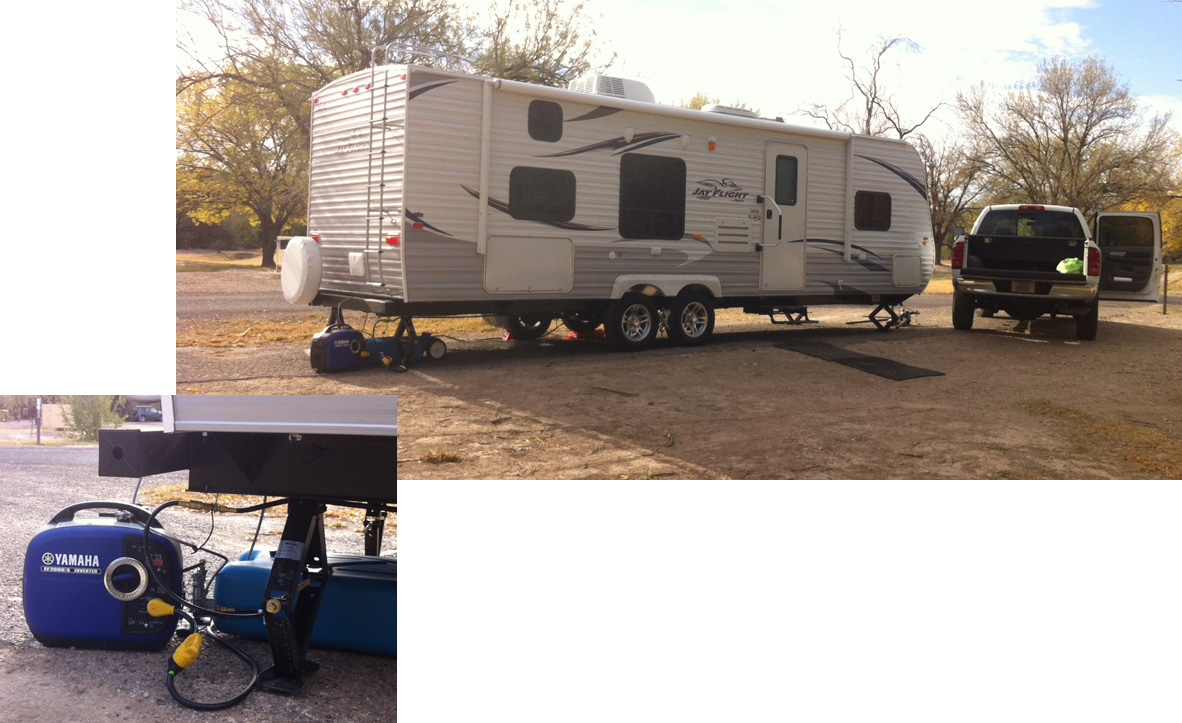
The week before Christmas, we went to Big Bend National Park. We stayed five nights in the Rio Grande Village campground, in a section that does not have utilities. This scenic spot is on the southeast border of the park. You can see it center-right in the image below amid the large cottonwood trees. In the far distance, about 20 miles away, are the Chisos Mountains, the focal point of the park.

This was our first multi-day RV boondocking experience, and the first trip in the new Jayco trailer. The solar project on our trailer was not completed in time for the trip so we had to rely on daily runs of the generator to recharge the batteries. It was probably just as well we didn't try solar, since it was pretty cloudy most of the time. We didn't even bother to bring the telescopes, knowing what the forecast was.
We were able to connect the tri-fuel Yamaha EF-2000isH generator directly to the BBQ propane line at the back of the trailer using a quick-connect fitting. The presence of this line was one of our unknowns leading up to the trip, since we couldn't find anything in the Jayco literature confirming that it was standard equipment, and we hadn't ordered the outside BBQ option. We got the trailer only three days before we headed to the park, but we knew we could fall back on gasoline for the generator if necessary.

Since the National Parks system has strong restrictions on where dogs can go in the park, we spent most of each day driving and walking the primitive back roads. Hiking trails were off-limits to us, except when we took turns taking short walks without Vali. Frankly, this restriction is the main reason we had never gone to Big Bend previously.
Here, we are approaching the Tinaja Carlota, a water catchment basin along the Old Ore Road, one of several day-long trips. The water level is very low, due to the continuing drought we're experiencing in Texas.

Big Bend is a very beautiful corner of the Chihuahua Desert with varied terrain and subtle colors. Here is part of the Rio Grande near the abandoned Johnson's Ranch.

Crossing the Rio Grande is forbidden, although it's very shallow here. The park has many warnings about crossing over to Mexico, although we saw signs that some Mexicans and their livestock were crossing into the U.S.
This is Pulliam Bluff which forms part of the northern edge of the Basin in the Chisos Mountains which lie at the center of the park.

This is another water catchment called Ernst Tinaja, also accessed along the Old Ore Road. Fantastic uplifted and folded layers of sedimentary rock.

Again, a very low water level. There were reports that various animals have fallen into this pool and drowned trying to get to the water. Here is another, more extreme, example of the rock layers in Ernst Tinaja

We saw signs of what might have been a mountain lion kill nearby including the large scat below, but very few animals overall in this portion of the park. Edward did see a javelina in the campground after dark, plus lots of deer sign, and we spotted a few hawks and other birds while driving including a pair of what we believed to be peregrine falcons.

Along the River Road that skirts the southern border of the park, lies the abandoned Mariscal Mine where cinnabar (mercury ore) was mined and refined. The tailings have a pronounced mauve color. The rubble in the area is an interesting mix of grey, mauve, and orange rocks

The Sierra del Carmen, which is in Mexico, across the river from the campground, glows red at sunset giving the range its name.


The park is a beautiful place, and we'd like to go back sometime when the weather is better to do some astronomy under their dark skies.

This was our first multi-day RV boondocking experience, and the first trip in the new Jayco trailer. The solar project on our trailer was not completed in time for the trip so we had to rely on daily runs of the generator to recharge the batteries. It was probably just as well we didn't try solar, since it was pretty cloudy most of the time. We didn't even bother to bring the telescopes, knowing what the forecast was.
We were able to connect the tri-fuel Yamaha EF-2000isH generator directly to the BBQ propane line at the back of the trailer using a quick-connect fitting. The presence of this line was one of our unknowns leading up to the trip, since we couldn't find anything in the Jayco literature confirming that it was standard equipment, and we hadn't ordered the outside BBQ option. We got the trailer only three days before we headed to the park, but we knew we could fall back on gasoline for the generator if necessary.
Here, we are approaching the Tinaja Carlota, a water catchment basin along the Old Ore Road, one of several day-long trips. The water level is very low, due to the continuing drought we're experiencing in Texas.

Big Bend is a very beautiful corner of the Chihuahua Desert with varied terrain and subtle colors. Here is part of the Rio Grande near the abandoned Johnson's Ranch.

Crossing the Rio Grande is forbidden, although it's very shallow here. The park has many warnings about crossing over to Mexico, although we saw signs that some Mexicans and their livestock were crossing into the U.S.
This is Pulliam Bluff which forms part of the northern edge of the Basin in the Chisos Mountains which lie at the center of the park.

This is another water catchment called Ernst Tinaja, also accessed along the Old Ore Road. Fantastic uplifted and folded layers of sedimentary rock.

Again, a very low water level. There were reports that various animals have fallen into this pool and drowned trying to get to the water. Here is another, more extreme, example of the rock layers in Ernst Tinaja

We saw signs of what might have been a mountain lion kill nearby including the large scat below, but very few animals overall in this portion of the park. Edward did see a javelina in the campground after dark, plus lots of deer sign, and we spotted a few hawks and other birds while driving including a pair of what we believed to be peregrine falcons.


The Sierra del Carmen, which is in Mexico, across the river from the campground, glows red at sunset giving the range its name.


The park is a beautiful place, and we'd like to go back sometime when the weather is better to do some astronomy under their dark skies.
Saturday, December 15, 2012
TrueTemp Heater Controller Fails
Just before leaving for the holidays, the unit failed. The measured temperature started drifting upwards, more than 20 deg F at this point. Certainly much more than can be compensated for by recalibration. I don't know yet if this is a problem with the temperature probe or the controller itself but it seems more likely to be the probe. After dissecting a bit, I can see that the temperature probe is not potted in sealant as most good probes are. There seems to be a simple rubber plug at the top of the probe tube.
Interestingly, with this type of failure, the usual trick of using a controller as a backup to the thermostat on the heating rod does not work. The controller effectively shuts off the power permanently and the tank goes cold. Fortunately, this failure is slower but had it happened while I was away, the results would likely have been serious. For now, the JBJ goes on the long list of unreliable heater controllers available on the market.

Update 2013.01.08 - Ordered and received a replacement temperature probe. The guess was correct as that replacement appears to fix the controller.
Friday, December 14, 2012
Travel Trailer Trade-Up
This afternoon, we traded in our Rockwood Roo hybrid travel trailer and brought home a new Jayco Jay Flight 28BHS. Here is the side-by-side on pickup day.

Though the Roo was a great trailer, the tent beds were a bit of a pain to deploy and were really cold in the winter, even when using heated mattresses. We ordered the new trailer from Jayco though the nearest dealer, Crestview RV in Buda, TX
We really like the floor-plan on the 28BHS, though we expect to make a few modifications.

The storage bay under the back bunks came with the new, larger access door. Compared to the Roo, the amount of storage is amazing.
Our planned modifications include:

Though the Roo was a great trailer, the tent beds were a bit of a pain to deploy and were really cold in the winter, even when using heated mattresses. We ordered the new trailer from Jayco though the nearest dealer, Crestview RV in Buda, TX
We really like the floor-plan on the 28BHS, though we expect to make a few modifications.

Our planned modifications include:
- add solar power
- fix the placement of the fresh water pump which rattles badly - it is not attached to a solid surface.
- redesign the back sleeping area as one-level bed, removing the shirt wardrobe and the bunk bed
- upgrade the bathroom vent to a more powerful fan
- replace the sewer vent tops with Cyclone vents
- replace the shore-power cable with a detachable version
- various hooks, hangers, and accessories
Monday, December 3, 2012
Gravel Trailer Pad
This fall, we decided to upgrade our small hybrid travel trailer to something which would afford us more seasons to camp. The original driveway parking place for the trailer was no longer an option nor was parking on the lawn.
While waiting for the new trailer to be delivered, we decided to convert part of this strip of lawn next to the carport into a gravel parking pad. This would be the proverbial "before" picture.


Next steps will be to bring in some top soil to fill in around the outer rounded corner of the pad and put in some landscaping bushes to frame it all in. We also need to complete the drain at the bottom of the pad, carrying the water further downhill into the back yard.
While waiting for the new trailer to be delivered, we decided to convert part of this strip of lawn next to the carport into a gravel parking pad. This would be the proverbial "before" picture.

After much reading we opted for a pad topped with decomposed granite, or DG, as an effective DIY project. Unfortunately, the soil in our front yard is heavy clay silt, not a particularly stable base to build on. Further down the grade of the yard, this gives way to layered river pebbles as I discovered in my observatory project.
First step was to excavate out some of the clay. We rented our friend the front loader and scrapped off layers of the clay ...

... depositing in out in the "wild" part of our back yard.

We excavated a section 12 ft by 70 ft leaving plenty of room to maneuver the trailer into place next to the carport. Overall depth is about 10" on average with a few over-zealous spots down 14".
Once the area was dug out, we cleaned up the edges and the two ends where the front loader couldn't reach by hand. This took several weeks.

In the process, we discovered the fabled sewer clean-out that the plumber insisted must exist. We knew from the utility department flag where the sewer line must run but not where the clean-out was. Naturally it ended up in the middle of the project area. We will treat this as a "feature" and use it as a dumping point to clean the RV tanks at home.

One of the design dilemmas was how to edge between the trailer pad and the surrounding lawn. When it came time to put in the base material, we only wanted to rent the front-loader one day to reduce rental costs. We needed something we could build ahead of time that would act as a temporary retaining wall and remain as an edging.
We decided to build edging that looks like an ancient fort. We fastened 6 foot sections of side-by-side 4" PT rounds. Every 6 foot we buried a couple in a bit of concrete to hold the assembly up. Here is the complicated rounded-corner bit in progress.

Once done, we had a self-standing basin in which to fill with material. The outside will eventually be backed by top-soil to within a few inches of the top. This will be less of a retaining wall and more of an industrial-grade edging when all is done.

Next step is to take care of that sewer clean-out which will be right in the path of the truck. We created forms with spare Sonotubes and rebar making a protective sleeve around the clean-out. We should be able to drive on it without stressing the plumbing.

We filled with a couple of bags of high tensile strength ready-mix concrete with a temporary wooden cap. This will form a lip into which I can drop a plate or other cover.

We are now ready to put in the base material. We had 28 yards of "road-base" delivered. This stuff is a combination of limestone "fines" and coarse rock up to 1" size. We had a couple of yards left-over at the end.
The two of us were able to complete the job of laying and compacting the road base in one very long day. This was done as a series of layers or "lifts", each about 2-3" deep. We placed the material in with the front loader, and raked it out by hand. We moistened it slightly as necessary and compacted each layer down with a steel-plate vibratory compactor. All of our reading emphasized the need to compact thin layers to make a solid base, especially when we are working with such a small compactor.

Though small, this model of compactor was surprisingly easy to use and minimized the vibrations transmitted to our hands. It vibrates in such a way that it moves forward on its own. The hard part is not pushing it forward, it is holding it back when we reach a tight corner.

Once all of the road-base was in, we came back to add some drainage features. The driveway is sloped downhill toward the house and off to the right. That places most of the run off at the bottom end of the trailer pad. Furthermore, the soil in the yard beyond is built up and does not drain very well. Previously heavy rains caused a pool under the carport.
Along the driveway side of the pad, we dug out a trench to lay a french drain. I guess technically this is a "curtain drain" since we are catching and redirecting flow rather than draining out sub-surface moisture. I forgot to snap a picture, but we drilled 1/2" holes in a 3" sewer-and-drain PVC pipe, placed it in the trench on top of a heavy geo-fabric, filled with clean rock, and wrapped it up.
This will catch and divert some of the run off and will also be tied to the gutter down-spout for the carport. This would not have been a great idea if this were a real french drain, but in this case it should work.

The trench is the over-filled with more rock awaiting the arrival of the decomposed granite.

Beyond the end of the trailer pad, along the fence line, we started digging another drain system. This is to divert all of the water that makes it to the end of the driveway as well as to drain the bottom end of the pad. We will finish this project on the second round. In the meantime, when it rains, we have a mucky catch-basin.

The process starts again, this time with the decomposed granite or DG. We had 7 yards of this material delivered. Again, we had about 1 yard left over.
The total height to fill with DG was 2". Again, are reading indicated that thinner is better in terms of getting a solid surface that does not get mushy. We ended up doing 7 separated lifts. More than necessary but it was easier to rake out that way. We did not have the front loader this time so the transfer was all shovel and wheelbarrow and took a bit over 2 days to finish.

Once completed, we rebuilt the gutter down-spout and tied it into the drainage.

We were very pleased with the result of the compacted decomposed granite. We did not use any of the fancy additives due to cost but the surface is still very hard. It has weathered one strong rain so far with no surface erosion or softening.
Here is the "after" picture of the pad.

Wednesday, November 28, 2012
Conjunction of Moon and Jupiter
On the drive home tonight, noticed a nice conjunction of Jupiter and the Moon. I quickly snapped a picture with the iPhone ... pretty washed out.

The grouping was tight enough that I was able to get both in a single frame of a Canon 450D with a 400mm lens ... much better. The star Epsilon Tauri was also close to the moon forming a triangle with Moon and Jupiter but I was not able to get all three in one frame.
Zooming in on the image of Jupiter, I was please to see that some of the banding detail was visible confirming it was, indeed, Jupiter. Also indicates that the sizes of the two disks in the image above are correct.
I then checked my 1/60sec exposure of the scene and found that I could also see the Galilean moons of Jupiter as well, though I am not able to see them on all monitors. From a planet looking at a moon, next to which is a planet, around which are other moons. Almost recursive!

Checking my ephemeris, it looks like Europa is at the bottom of the frame with Io above it, Callisto is faint near the top of the image and possibly Ganymede just peaking out at the top right of the disk of Jupiter.

The grouping was tight enough that I was able to get both in a single frame of a Canon 450D with a 400mm lens ... much better. The star Epsilon Tauri was also close to the moon forming a triangle with Moon and Jupiter but I was not able to get all three in one frame.
 |
| Moon and Jupiter - 2012.11.28 ~20:00 CST - Georgetown, TX - Canon 450D f/5.6 1/4000sec, 400mm |
Zooming in on the image of Jupiter, I was please to see that some of the banding detail was visible confirming it was, indeed, Jupiter. Also indicates that the sizes of the two disks in the image above are correct.
 |
| Details of Jupiter |

Checking my ephemeris, it looks like Europa is at the bottom of the frame with Io above it, Callisto is faint near the top of the image and possibly Ganymede just peaking out at the top right of the disk of Jupiter.
Sunday, October 7, 2012
Phèdre, Three Decades Later
 |
| Title page of the 1678 edition |
My grandfather tried, with much patience but little success, to get me to memorize the lines as well. Though I was enthusiastic, my command of French at the time was not up to the task. I remembered something about a guy on a chariot and some horses, something about Neptune, and not much else.
Recently, I was reminded of these lunchtime literary forays and looked up the text on the internet. I also found a great amateur dramatization on YouTube by Pierre Thurias which inspired me on how it should sound when read in a dramatic style.
After 36 years, I resolved to fully understand this work and to finally memorize it in honor of my grandfather who passed away a few years ago. This turned out to be less daunting than I had feared. The alexendrine poetic meter of Racine's works and the vivid action described in the passage made it easier to memorize than expected. After learning a few lines each evening, I finally finished this week.
Here is the text in modern French along with my own attempt at an English translation; I was not enamored with the translations that I found.
La mort d'Hippolyte, suivant le récit de Théramène
Phèdre, Acte V, Scene VI
| A peine nous sortions des portes de Trézène, | Scarcely had we left the gates of Troezen, |
| Il était sur son char. Ses gardes affligés | He was on his chariot. His sorrowful guards, |
| Imitaient son silence, autour de lui rangés ; | Gathered about him, imitated his silence. |
| Il suivait tout pensif le chemin de Mycènes ; | He followed the road to Mycenae, deep in thought, |
| Sa main sur ses chevaux laissait flotter les rênes ; | His hand on his horses, held loosely the reins; |
| Ses superbes coursiers, qu'on voyait autrefois | Those superb horses, that we used to see, |
| Pleins d'une ardeur si noble obéir à sa voix, | Full of noble passion, obeying his every word, |
| L'oeil morne maintenant et la tête baissée, | Now, with eyes mournful and heads lowered, |
| Semblaient se conformer à sa triste pensée. | They seemed to reflect the sadness of his thoughts. |
| Un effroyable cri, sorti du fond des flots, | A horrible cry, risen from the depths of the water, |
| Des airs en ce moment a troublé le repos ; | Now troubled the restful atmosphere; |
| Et du sein de la terre, une voix formidable | And from the womb of the earth, a tremendous voice |
| Répond en gémissant à ce cri redoutable. | Moaned in response to that fearsome cry |
| Jusqu'au fond de nos coeurs notre sang s'est glacé ; | To the bottom of our hearts, our blood ran cold; |
| Des coursiers attentifs le crin s'est hérissé. | The horses, attentive, bristled their hair. |
| Cependant, sur le dos de la plaine liquide, | Meanwhile, on the surface of the liquid plain, |
| S'élève à gros bouillons une montagne humide ; | There arose, boiling, a watery mountain; |
| L'onde approche, se brise, et vomit à nos yeux, | The wave approached, broke, and vomited in our eyes, |
| Parmi des flots d'écume, un monstre furieux. | Amid flows of foam, a furious monster |
| Son front large est armé de cornes menaçantes ; | His large forehead was armed with menacing horns; |
| Tout son corps est couvert d'écailles jaunissantes ; | All his body was covered in yellowish scales; |
| Indomptable taureau, dragon impétueux, | An untamable bull, a raging dragon, |
| Sa croupe se recourbe en replis tortueux. | His rump bent on itself in tortuous folds. |
| Ses longs mugissements font trembler le rivage. | His long roars caused the shore to tremble. |
| Le ciel avec horreur voit ce monstre sauvage, | In horror, the sky witnessed this wild monster, |
| La terre s'en émeut, l'air en est infecté ; | The earth was disturbed by it, the air was fouled with it; |
| Le flot qui l'apporta recule épouvanté. | The flow that brought it retreated in fright. |
| Tout fuit ; et sans s'armer d'un courage inutile, | All fled, and without taking useless courage, |
| Dans le temple voisin chacun cherche un asile. | Everyone sought asylum in the nearby temple. |
| Hippolyte lui seul, digne fils d'un héros, | Only Hippolytus, worthy son of a hero, |
| Arrête ses coursiers, saisit ses javelots, | Stopped his horses, seized his javelins, |
| Pousse au monstre, et d'un dard lancé d'une main sûre, | Pushed towards the monster, and with a dart thrown by a steady hand, |
| Il lui fait dans le flanc une large blessure. | He made in its flank a large wound |
| De rage et de douleur le monstre bondissant | In rage and in pain, the monster, bounding, |
| Vient aux pieds des chevaux tomber en mugissant, | Came to the horses' feet and fell roaring, |
| Se roule, et leur présente une gueule enflammée | Rolled, and showed them his flaming maw |
| Qui les couvre de feu, de sang et de fumée. | Which covered them with fire, blood, and smoke. |
| La frayeur les emporte, et sourds à cette fois, | Fear took them and, deaf this once, |
| Ils ne connaissent plus ni le frein ni la voix ; | They knew no more, neither brake nor voice; |
| En efforts impuissants leur maître se consume ; | In ineffectual attempts, their master was consumed; |
| Ils rougissent le mors d'une sanglante écume. | They reddened their bridle bits in a bloody foam. |
| On dit qu'on a vu même, en ce désordre affreux, | It is even said that there was seen amid this atrocious chaos, |
| Un dieu qui d'aiguillons pressait leur flanc poudreux. | A god that, with a prod, goaded their dusty flanks. |
| A travers des rochers la peur les précipite. | Across the boulders, fear drove them on |
| L'essieu crie et se rompt : l'intrépide Hippolyte | The axle screeched and broke : the intrepid Hippolytus |
| Voit voler en éclats tout son char fracassé ; | Saw his splintered chariot fly to pieces; |
| Dans les rênes lui-même, il tombe embarrassé. | In the reins, he himself fell entangled. |
| Excusez ma douleur. Cette image cruelle | Forgive me my pain. This cruel sight |
| Sera pour moi de pleurs une source éternelle. | Will be to me an eternal source of tears. |
| J'ai vu, Seigneur, j'ai vu votre malheureux fils | I saw, my lord, I saw your wretched son |
| Traîné par les chevaux que sa main a nourris. | Dragged by the very horses which his hand had fed. |
| Il veut les rappeler, et sa voix les effraie ; | He wanted to call them back but his voice frightened them |
| Ils courent ; tout son corps n'est bientôt qu'une plaie. | They ran; all of his body was soon but a single wound |
| De nos cris douloureux la plaine retentit. | The plain rang out with our painful shouts. |
| Leur fougue impétueuse enfin se ralentit ; | Their headlong fury soon slowed; |
| Ils s'arrêtent non loin de ces tombeaux antiques | They stopped not far from those ancient tombs |
| Où des rois ses aïeux sont les froides reliques, | Where kings, his ancestors, are the cold relics. |
| J'y cours en soupirant, et sa garde me suit. | I ran gasping and his guard followed me. |
| De son généreux sang la trace nous conduit, | The generous traces of his blood guided us there, |
| Les rochers en sont teints, les ronces dégouttantes | The rocks were stained with it, the disgusting brambles |
| Portent de ses cheveux les dépouilles sanglantes. | Bore the bloody remains of his hair. |
| J'arrive, je l'appelle, et me tendant la main, | I arrived and called him. He, reaching with his hand, |
| Il ouvre un oeil mourant qu'il referme soudain : | Opened a dying eye which he closed again suddenly. |
| "Le ciel, dit-il, m'arrache une innocente vie. | "Heaven," he said, "has ripped from me an innocent life. |
| Prends soin après ma mort de la triste Aricie. | Take care, after my death, of the sad Aricie. |
| Cher ami, si mon père un jour désabusé | Dear friend, if someday my father, disabused, |
| Plaint le malheur d'un fils faussement accusé, | Complains of the misfortune of a falsely accused son, |
| Pour apaiser mon sang et mon ombre plaintive, | To assuage my blood and my mournful shadow, |
| Dis-lui qu'avec douceur il traite sa captive, | Tell him to treat with care his captive, |
| Qu'il lui rende ..." A ce mot, ce héros expiré | That he return to her ..." At these words, this expired hero |
| N'a laissé dans mes bras qu'un corps défiguré, | Left in my arms but a disfigured body. |
| Triste objet, où des dieux triomphe la colère. | Sad object, where the gods' anger triumphed. |
| Et que méconnaîtrait l'oeil même de son père. | And whose father would not recognize him by sight. |
The Death of Hippolyte in Artwork
This 17th century painting by the master Rubens, captures much of the action of the death of Hippolytus including the horses balking at the half bull, half serpent, sea monster. However, the attributed date of this painting (1611-1613) predates Racine by several decades so clearly the painting was based on and earlier Greek or Roman version, not on Racine's adaptation. Perhaps that explains why the painting does not depict a bloodied body as described by Racine.
 |
"La mort d’Hippolyte" (ca. 1612) by Pierre Paul Rubens - Cambridge, Fitzwilliam Museum
|
This image by the 18th century French artist Jean François de Troy shows the god Poseidon astride his sea monster, goading the horses in their flight with his trident.
 |
"La Mort d'Hippolyte" (1727), Etching based on a Painting by Jean François de Troy - British Museum
|
Here is another image from the early 19th century French painter, Joseph-Désiré Court. Again, surprisingly unbloodied for a fellow that has just been dragged to death.
 |
"Hyppolite renversé de son Char" (1825) by Joseph Désiré Court
|
Late 19th and early 20th century Dutch born, British painter, Sir Lawrence Alma-Tadema clearly shows the hero entangled in the reins and being dragged.
 |
"The Death of Hippolyte" (1860) by Sir Lawrence Alma-Tadema - Private Collection
|
Friday, September 21, 2012
Triangulum Galaxy
Image of the Triangulum Galaxy (M33) in Triangulum. It is sometimes incorrectly called the Pinwheel Galaxy, a name properly given to M101.

At 2.5 million light-years away, this galaxy is part of the "Local Group" whose three largest members are the Andromeda, Milky Way, and Triangulum galaxies. It can be found in the same region of the sky as the Andromeda galaxy which is easier to find with the naked eye. I simply follow the "pointer" stars Beta and Mu Andromedae in the opposite direction.
Image was taken from Georgetown with a TMB-130SS refractor with a QSI-540 CCD and Astronomik RGB filters. Exposure lengths of 500s R, 400s G, 600s B. Diffraction spikes on the stars were added in post-processing.
Within the arms of the galaxy in this image, you should be able to find several large emission nebulae glowing pink.
Monday, September 3, 2012
Venus Transit Aureole Captured
The new October 2012 issue of Sky and Telescope has an article by Jay M. Pasachoff entitled "A Glorious Transit of Venus." One of the items explained in the article is the occurrence of an "aureole" around the polar region of Venus caused by sunlight refracting through the upper atmosphere of the planet. The article featured the results of a team of astronomers on Haleakala who were specifically observing this phenomena.
Hey, that's were we were ... well, almost. This group was in the astronomical complex on the next hill over from our location at Red Summit. I am sorry that their location was restricted; I should like to have met with some of the observers over there.
The article motivated me to look more carefully at my prominence-detail exposures around ingress and egress. Sure enough, several frames during ingress show a clear illumination arc which I presume to be the same phenomena as described in the S&T article.
The one below, taken at 17h20 GMT, just before second contact showed the best detail. Images were taken with a Lunt LS60T/PS Hydrogen-Alpha telescope with a DMK41 monochromatic video camera. Since I was primarily trying to get full-disk images, I was not using any additional optical magnification. The resolution is not great on these enlarged images but you should be able to see the arc. You may have to brighten your screen intensity to see it as the contrast is still pretty low.

and here again zoomed in with annotation in both grey-scale and false-color gradient which is easier to view on darker monitors.
No such luck during egress. I am missing the prominence-exposure frames that might have shown something.
Hey, that's were we were ... well, almost. This group was in the astronomical complex on the next hill over from our location at Red Summit. I am sorry that their location was restricted; I should like to have met with some of the observers over there.
The article motivated me to look more carefully at my prominence-detail exposures around ingress and egress. Sure enough, several frames during ingress show a clear illumination arc which I presume to be the same phenomena as described in the S&T article.
The one below, taken at 17h20 GMT, just before second contact showed the best detail. Images were taken with a Lunt LS60T/PS Hydrogen-Alpha telescope with a DMK41 monochromatic video camera. Since I was primarily trying to get full-disk images, I was not using any additional optical magnification. The resolution is not great on these enlarged images but you should be able to see the arc. You may have to brighten your screen intensity to see it as the contrast is still pretty low.
| Venus Polar Aureole - Greyscale image in H-alpha light |
| Venus Polar Aureole - False-color gradient map |
No such luck during egress. I am missing the prominence-exposure frames that might have shown something.
Friday, August 31, 2012
Testing the AP-27TVPH Focal Reducer
I just acquired a 0.75x Astro-Physics 27TVPH focal reducer for use with my TMB130ss refractor. While waiting for some better skies, I did some initial tests to see if field curvature or vignetting effects are noticeable and am summarizing those results here.
Imaging Train
The imaging train for these tests is the following:
The camera I am using is the QSI-540ws which has a KAI-04022 sensor with 7.4um pixels. The sensor is square with a 21.4mm diagonal. Although all tests are based on that camera, the popular KAF-8300 sensor included in many of the new affordable CCD cameras has nearly the same diagonal size, 22.5mm, though not square. I would expect nearly the same geometry and curvature results.
Geometry Results
For each T2 extension tube length, I measured the distance from the back edge of the AP-27TVPH focal reducer to the "seam" of the QSI-540ws camera body. This seam between the blue and black parts is approximately 1mm in front of the CCD sensor according to QSI Imaging technical drawings. This distance is reported in the table below as CCD (mm).
For each extension length, after bringing the image into focus with a Bhatinov mask, I noted the position on the measurement scale of the FT-3035 focuser. This is reported in the table as Focus (mm). You can see that the set of tests span most of the focusing range of the FT-3035.
To get an accurate measure of the reduction factor, I used the PinPoint plate solving feature in MaximDL to compute the image scale of each star field I imaged, reported as Scale ("/px), and the corresponding focal length. The magnification factor, reported in the table as Mag (x), is the ratio of the focal length computed with the focal reducer to that computed without the focal reducer.
The specifications of the focal reducer state that CCD=118mm would give the nominal 0.75x reduction factor assuming I am measuring from the correct point. My experimental results give this reduction factor at CCD=127mm. I don't have an explanation for this 9mm discrepancy.
Field Curvature Results
For each setting, I shot a 20 sec, unbinned image of the star field around the bright star Sadr in Cyngnus to test geometry and illumination. The image below shows the full frame for each of the focal reducer positions. All images were subjected to identical gamma stretching so relative brightness can be compared.
For each of the star field images, I then magnified the lower-left corner of the frame to see the degree of radial "smear" in the image. Similar visual results for the other three corners are not shown. These tests also show the effect of some under-sampling resulting from the use of the focal reducer. My skies are usually around 2" to 3".
As expected, the curvature effects are more noticeable at the larger reduction factors. The image for 81mm has more distortion than I expected. Looking over the full frame, the 132mm configuration was noticeably worse. I am going to try to stick with something around 120mm though the reduction is 0.76x at that distance. The field is not as flat as I had hoped but will probably be a reasonable compromise in order to shorten the required imaging times.
Vignetting Results
For each setting, I shot a 0.1 sec flat field using an Aurora electro-luminescent panel. For the focal reducer tests, this placed the peak intensity near the 40% grey point and about half that for the non focal reducer test.
In MaximDL, I used the Line tool to graph the illumination intensity across the diagonal of the sensor. I also set the white and black point of the images to the span the range of pixels. Each of the images below shows the stretched image and the line graph. I do not have any more sophisticated curvature analysis software but this gives the general idea.
Eyeballing the lowest and highest averaged values along the curve and taking the ratio, the vignetting gives a 5% decrease in the corners without the focal reducer and up to 8% with the focal reducer. Both of these are easily corrected with a flat-field normalization, so not much of a concern with this sensor size.
Flip Mirror Options
When imaging, I like having the ability to quickly switch to an eyepiece to get a wider field of view to provide context, to try looking at a target visually, or simply to align the mount without removing the camera. I had been using an imaging train that I put together for this purpose. However, with 120 mm to work with now, that system is no longer usable. The Vixen flip-mirror insertion length is too large.
After much hunting, I found a candidate solution using the TFlip mirror from Teleskop Service which has an 82 mm insertion length. In the USA, I was please to find it offered by Optcorp. I also found an on-line review by a Polish amateur astronomer.

The unit has female T2 threads on both sides of the imaging path and male T2 threads on the eyepiece port. This is the threading standard I am already using and so no room is wasted working around other thread types or push-fits. Back-of-the-envelope calculations verify that this will just fit into my system. I will update on the results if I ever spring for the steep $250 purchase price.
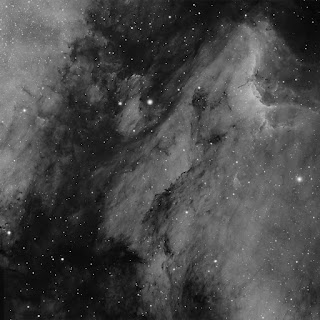
Update 2012.09.02 - Last night, we had clear but slightly hazy skies under a full moon. I tested the focal reducer on the Pelican Nebula under H-alpha light. The first processed image below is from a stack of 23 Ha images, each 15 min. I chose the 117mm extension length giving 0.7657x according to MaximDL plate solve or a focal ratio of f/5.4
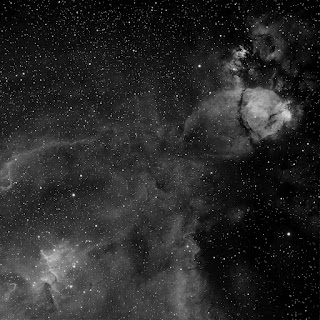
Update 2012.09.03 - The second H-alpha image below uses same configuration with 25 frames of 900s exposures. This is part of the Heart Nebula including the central star cluster and the "tip" of the heart formation. The stars in this second image were not nearly as smooth as the first one. I had to do more clean-up work.
Imaging Train
The imaging train for these tests is the following:
- TMB-130ss refractor, focal length 910mm at f/7
- Feather Touch focuser option [Starlight Instruments, FT-3035]
- Replacement focuser end cap with AP 2.7" threads [Starlight Instruments, EC35-505AP]
- 0.75x Focal Reducer [Astro-Physics, 27TVPH]
- Adapter from 2.7" threads to SCT threads, 8mm insertion length [Astro-Physics, ADA204]
- Adapter from SCT threads to T threads, 18mm insertion length [Antares]
- T-thread extension barrels, various lengths
- Baader T2 Quick-changer, 15mm insertion length [Alpine Astro, T2-6,7]
- QSI-540ws with T-thread mounting plate, 21.4mm diagonal
The camera I am using is the QSI-540ws which has a KAI-04022 sensor with 7.4um pixels. The sensor is square with a 21.4mm diagonal. Although all tests are based on that camera, the popular KAF-8300 sensor included in many of the new affordable CCD cameras has nearly the same diagonal size, 22.5mm, though not square. I would expect nearly the same geometry and curvature results.
Geometry Results
For each T2 extension tube length, I measured the distance from the back edge of the AP-27TVPH focal reducer to the "seam" of the QSI-540ws camera body. This seam between the blue and black parts is approximately 1mm in front of the CCD sensor according to QSI Imaging technical drawings. This distance is reported in the table below as CCD (mm).
For each extension length, after bringing the image into focus with a Bhatinov mask, I noted the position on the measurement scale of the FT-3035 focuser. This is reported in the table as Focus (mm). You can see that the set of tests span most of the focusing range of the FT-3035.
To get an accurate measure of the reduction factor, I used the PinPoint plate solving feature in MaximDL to compute the image scale of each star field I imaged, reported as Scale ("/px), and the corresponding focal length. The magnification factor, reported in the table as Mag (x), is the ratio of the focal length computed with the focal reducer to that computed without the focal reducer.
| CCD (mm) | Focus (mm) | Mag (x) | F-Ratio | Scale ("/px) |
|---|---|---|---|---|
-
|
-
|
1.000
|
f/7.0
|
1.68
|
132
|
22
|
0.743
|
f/5.2
|
2.26
|
124
|
37
|
0.754
|
f/5.3
|
2.22
|
117
|
51
|
0.765
|
f/5.4
|
2.19
|
102
|
75
|
0.786
|
f/5.5
|
2.13
|
81
|
109
|
0.815
|
f/5.7
|
2.06
|
Field Curvature Results
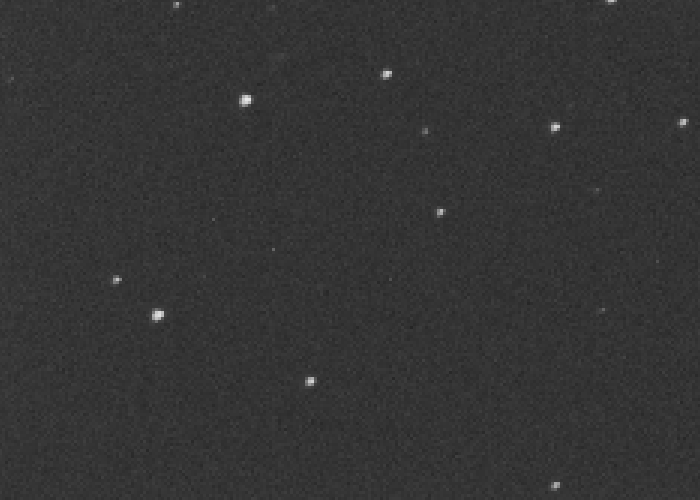
For each setting, I shot a 20 sec, unbinned image of the star field around the bright star Sadr in Cyngnus to test geometry and illumination. The image below shows the full frame for each of the focal reducer positions. All images were subjected to identical gamma stretching so relative brightness can be compared.
 |
| Sadr star-field at each focal-reducer spacing |
For each of the star field images, I then magnified the lower-left corner of the frame to see the degree of radial "smear" in the image. Similar visual results for the other three corners are not shown. These tests also show the effect of some under-sampling resulting from the use of the focal reducer. My skies are usually around 2" to 3".
 |
| Bottom-left corner with no focal reducer |
 |
| Bottom-left corner with 81mm focal reducer spacing |
 |
| Bottom-left corner with 102mm focal reducer spacing |
 |
| Bottom-left corner with 117mm focal reducer spacing |
 |
| Bottom-left corner with 124mm focal reducer spacing |
 |
| Bottom-left corner with 132mm focal reducer spacing |
As expected, the curvature effects are more noticeable at the larger reduction factors. The image for 81mm has more distortion than I expected. Looking over the full frame, the 132mm configuration was noticeably worse. I am going to try to stick with something around 120mm though the reduction is 0.76x at that distance. The field is not as flat as I had hoped but will probably be a reasonable compromise in order to shorten the required imaging times.
Vignetting Results
For each setting, I shot a 0.1 sec flat field using an Aurora electro-luminescent panel. For the focal reducer tests, this placed the peak intensity near the 40% grey point and about half that for the non focal reducer test.
In MaximDL, I used the Line tool to graph the illumination intensity across the diagonal of the sensor. I also set the white and black point of the images to the span the range of pixels. Each of the images below shows the stretched image and the line graph. I do not have any more sophisticated curvature analysis software but this gives the general idea.
Eyeballing the lowest and highest averaged values along the curve and taking the ratio, the vignetting gives a 5% decrease in the corners without the focal reducer and up to 8% with the focal reducer. Both of these are easily corrected with a flat-field normalization, so not much of a concern with this sensor size.
 |
| Flat-field illumination with no focal reducer |
 |
| Flat-field illumination with 81mm focal reducer spacing |
 |
| Flat-field illumination with 102mm focal reducer spacing |
 |
| Flat-field illumination with 117mm focal reducer spacing |
 |
| Flat-field illumination with 124mm focal reducer spacing |
 |
| Flat-field illumination with 132mm focal reducer spacing |
Flip Mirror Options
When imaging, I like having the ability to quickly switch to an eyepiece to get a wider field of view to provide context, to try looking at a target visually, or simply to align the mount without removing the camera. I had been using an imaging train that I put together for this purpose. However, with 120 mm to work with now, that system is no longer usable. The Vixen flip-mirror insertion length is too large.
After much hunting, I found a candidate solution using the TFlip mirror from Teleskop Service which has an 82 mm insertion length. In the USA, I was please to find it offered by Optcorp. I also found an on-line review by a Polish amateur astronomer.

Update 2012.09.02 - Last night, we had clear but slightly hazy skies under a full moon. I tested the focal reducer on the Pelican Nebula under H-alpha light. The first processed image below is from a stack of 23 Ha images, each 15 min. I chose the 117mm extension length giving 0.7657x according to MaximDL plate solve or a focal ratio of f/5.4


Subscribe to:
Posts (Atom)